BAAM AI Blog
Mailchimp SMTP Server: The Practical Guide To Setting It Up Correctly
The Mailchimp SMTP server is not the same thing as your regular Mailchimp campaign-sending account. When people search for “mailchimp smtp server,” they are usually trying to send transactional emails through...
The Mailchimp SMTP server is not the same thing as your regular Mailchimp campaign-sending account. When people search for “mailchimp smtp server,” they are usually trying to send transactional emails through Mailchimp Transactional, the product formerly known as Mandrill. That matters because password resets, receipts, signup confirmations, booking alerts, and app notifications need different handling than newsletters.
Mailchimp Transactional lets you send email through SMTP or API, so you can often connect it to an existing website, app, CRM, or WordPress SMTP plugin without rebuilding your whole email system. The basic idea is simple: instead of your server trying to send mail directly, your application hands the message to Mailchimp’s SMTP infrastructure, and Mailchimp handles delivery. The details still matter, especially authentication, domain setup, sender reputation, and whether SMTP is actually the right choice for your use case.
The key distinction is this: Mailchimp Marketing is for campaigns and audience-based email, while Mailchimp Transactional is for one-to-one, event-triggered messages. Mailchimp’s own developer documentation describes transactional email as one-to-one email for messages such as password resets, order confirmations, and welcome messages. To use the full transactional product, Mailchimp also states that you need a Standard or Premium Mailchimp account, and transactional email is priced in blocks of 25,000 emails.
Why Mailchimp SMTP Server Setup Matters
Transactional email is usually invisible until it breaks. Nobody compliments your password reset email when it arrives in three seconds, but they definitely notice when it lands in spam or never arrives at all. That is why Mailchimp SMTP server setup should be treated as infrastructure, not as a quick copy-and-paste setting.
SMTP is useful because it works with almost every mature website platform, backend framework, and email plugin. Mailchimp says its SMTP integration is designed so teams already sending transactional email through SMTP can usually change their SMTP configuration to use Mailchimp Transactional SMTP credentials instead. That makes it practical for teams that want better email delivery without rewriting their app around a new API immediately.
The bigger risk is assuming SMTP credentials alone are enough. Mailchimp requires domain verification and authentication before transactional users can send to external recipients, and its domain authentication guidance explains that authenticated sending can improve delivery by proving you are a legitimate sender. Gmail and Yahoo also require stronger sender authentication practices, including DMARC for senders that pass certain daily volume thresholds, which makes proper DNS setup non-negotiable for serious businesses.
The Mailchimp SMTP Framework
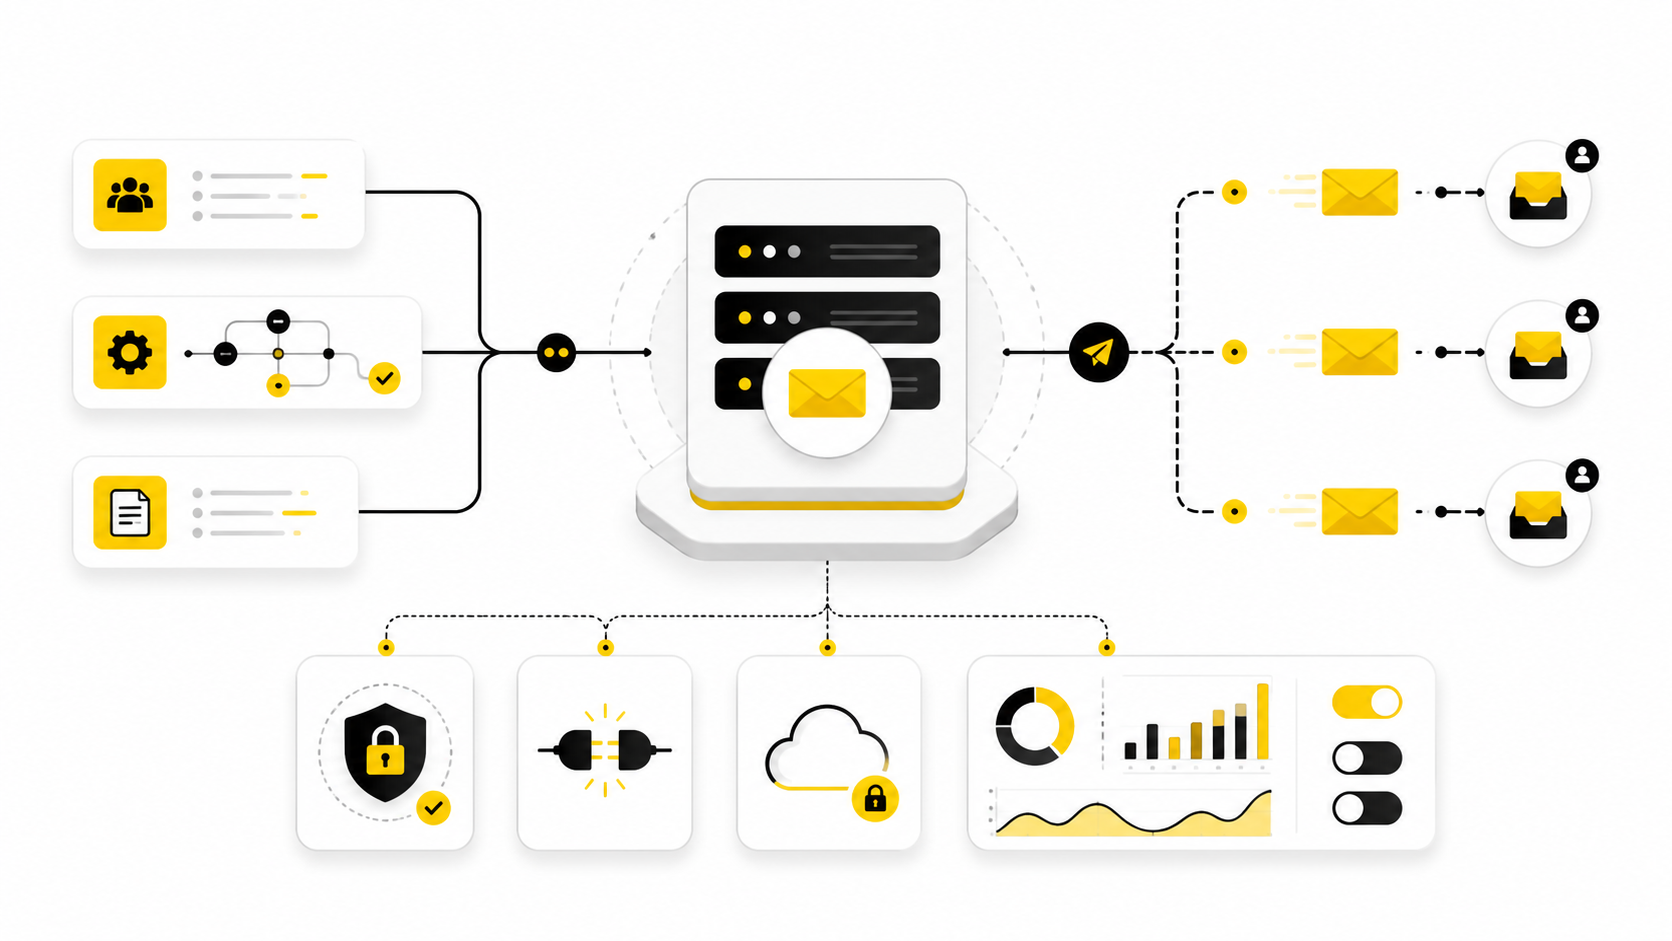
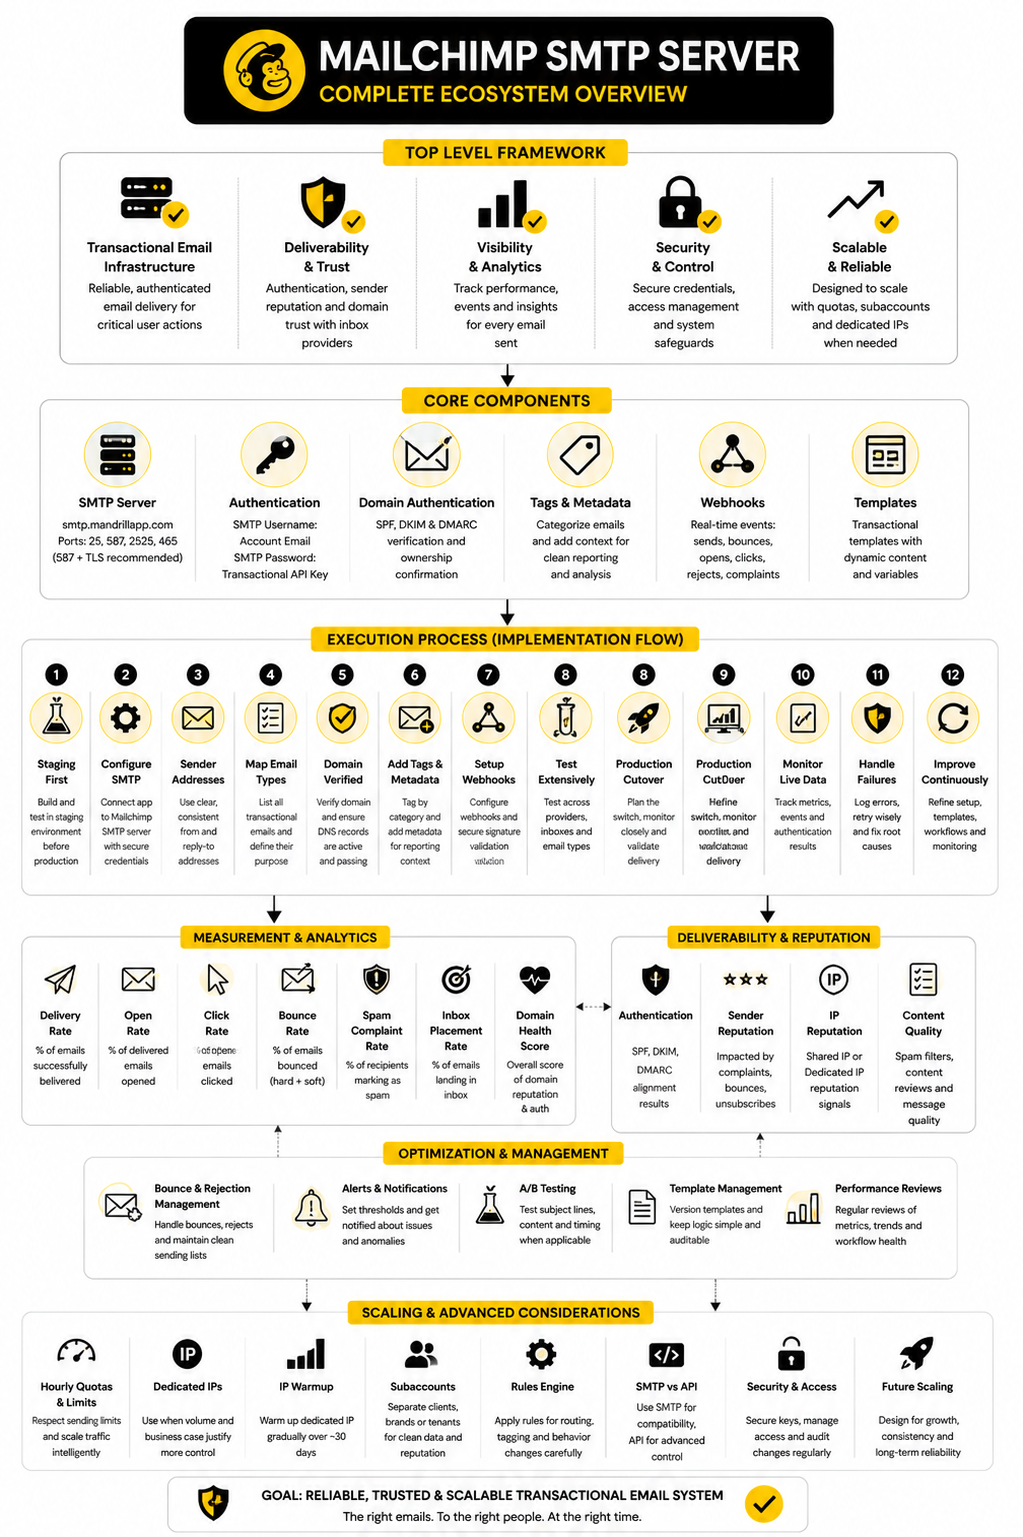
Think of the Mailchimp SMTP server setup as four layers working together: your app, the SMTP connection, Mailchimp Transactional, and the recipient inbox provider. Your app creates the email, the SMTP connection securely passes it to Mailchimp, Mailchimp processes the message, and inbox providers evaluate whether the message deserves the inbox, spam folder, or rejection. When one layer is weak, the whole system becomes unreliable.
The framework starts with credentials. Mailchimp Transactional uses SMTP credentials generated inside your transactional account, and those credentials are what your app or SMTP plugin uses to authenticate. The setup is not just “server, username, password”; it also includes port choice, encryption, sending domain, DNS records, and message type.
Then comes trust. Mailchimp’s authentication documentation covers the domain setup needed before sending from your domain, including DKIM and other delivery-related requirements. This is where many bad implementations fail: they connect SMTP first, send a test email, see that one message arrived, and assume the job is done.
Core Components Of A Reliable Mailchimp SMTP Setup
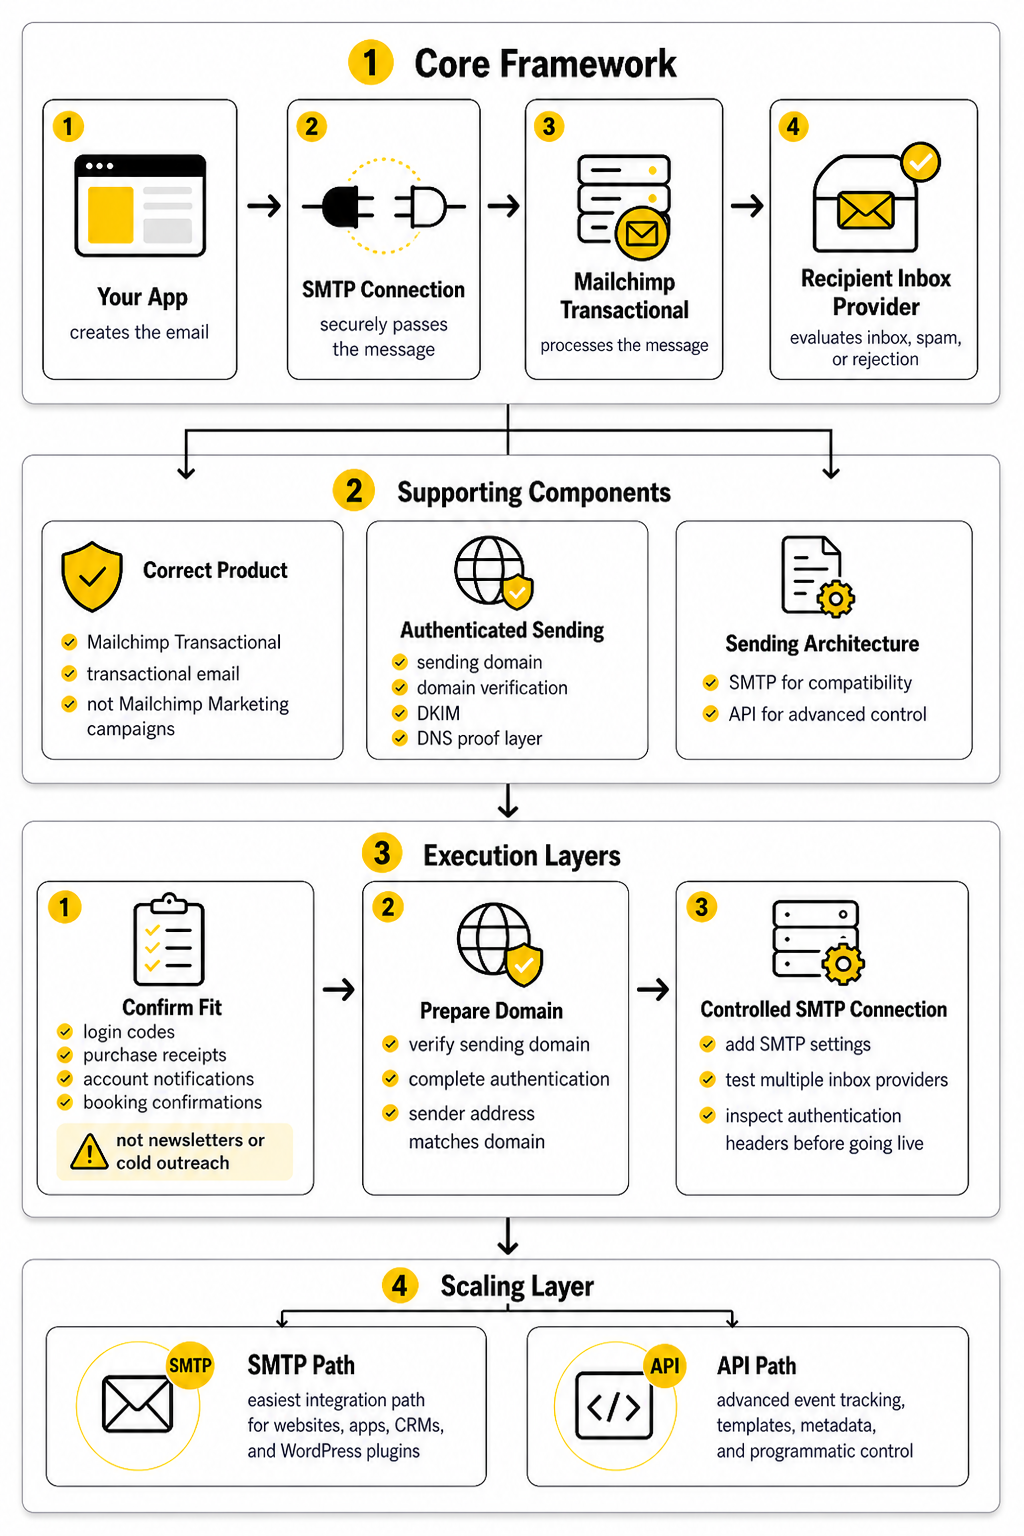
A reliable Mailchimp SMTP server setup starts with the correct product. You need Mailchimp Transactional, not just a standard Mailchimp email campaign account. The official pricing page explains that transactional email is sold in monthly blocks, with each block containing 25,000 transactional emails, so volume planning should happen before implementation rather than after the first billing surprise.
The next component is authenticated sending. Mailchimp’s help center explains that domain authentication proves you are a legitimate sender and can improve delivery, while unauthenticated sending can create delivery problems. In plain English, DNS is not a boring technical afterthought here; it is the proof layer that tells inbox providers your app is allowed to send from your domain.
The third component is the sending architecture around SMTP itself. SMTP is often the easiest integration path for WordPress sites, ecommerce platforms, CRMs, and older apps because most of them already support external SMTP providers. If you are building a more advanced product with event tracking, templates, metadata, and programmatic control, the Mailchimp Transactional API may eventually become the cleaner option, but SMTP is still a strong starting point when compatibility is the priority.
Professional Implementation Steps
A professional setup begins by confirming that Mailchimp Transactional fits the job. Use it for operational messages such as login codes, purchase receipts, account notifications, and booking confirmations. Do not use it as a workaround for bulk newsletters, cold outreach, or promotional campaign sending, because that mixes intent and can damage deliverability.
Next, prepare the domain before touching your production app. Verify the sending domain, complete authentication, and make sure the sender address matches the domain you actually want customers to see. Mailchimp’s guide to sending your first transactional email specifically frames DNS configuration and domain verification as steps that come before reliable sending.
Finally, connect SMTP in a controlled environment first. Add the Mailchimp SMTP server settings to your app, website, or plugin, send test messages to multiple inbox providers, and inspect headers for authentication results before switching real customer email over. This slower path is not bureaucracy; it prevents the classic mistake where a business only discovers broken transactional email after customers are already locked out, missing receipts, or abandoning checkout.
Step 1: Confirm That SMTP Is The Right Integration Path
Before you configure the Mailchimp SMTP server, decide whether SMTP is actually the right path for your setup. SMTP is the practical choice when your website, app, CRM, checkout tool, or WordPress plugin already supports external SMTP credentials. Mailchimp’s developer documentation says existing SMTP senders can typically switch their credentials to Mailchimp Transactional SMTP once the account and sending domain are ready.
The tradeoff is control. SMTP is excellent for sending messages, but Mailchimp’s own documentation makes a clear distinction between SMTP and the Transactional API: the API gives you more direct access to reporting data and application-level workflows. That means SMTP is usually best when you want fast compatibility, while the API is often better when your product team needs deeper event tracking, template control, or custom reporting inside your app.
For most business websites, SMTP is still the clean first move. A form notification, order confirmation, account alert, or appointment email does not need a complex engineering project. It needs authenticated delivery, stable credentials, and a setup that does not fall apart the next time a plugin updates.
Step 2: Create And Protect Your Transactional API Key
Mailchimp Transactional uses an API key as the SMTP password. That is important because your “SMTP password” is not a normal mailbox password, and it should not be casually pasted into random tools without access control. Mailchimp lists the SMTP password requirement as any valid Mailchimp Transactional API key in its SMTP integration documentation.
Treat that key like production infrastructure. Store it in your application’s environment variables, your hosting control panel’s secret manager, or the secure settings area of the tool that needs it. Do not put it in public repositories, shared screenshots, onboarding documents, or client-facing Loom videos.
You should also avoid using one key everywhere. If your WordPress site, SaaS app, staging environment, and internal tool all use the same credential, troubleshooting becomes messy and key rotation becomes painful. A cleaner setup uses separate credentials where the platform allows it, so you can isolate risk and replace access without disrupting every system at once.
Step 3: Use The Correct Mailchimp SMTP Server Settings
The standard Mailchimp SMTP server address is smtp.mandrillapp.com. Mailchimp lists the supported SMTP ports as 25, 587, 2525, and 465 for SSL. In most modern setups, port 587 with TLS is the most practical starting point because it is widely supported and designed for authenticated email submission.
Your SMTP configuration will usually look like this:
Do not overcomplicate this part. If your tool asks for SSL instead of TLS, port 465 may be the better match. If your host blocks port 25, which many do, use 587 or 2525 instead of fighting the hosting provider.
Step 4: Set Up Domain Authentication Before Real Sending
The most common amateur mistake is connecting SMTP before the sending domain is properly authenticated. The email may appear to send, but that does not mean inbox providers trust it. Mailchimp’s authentication documentation says setup requires adding a sending domain, creating a DMARC policy, configuring DNS for DKIM authentication, and verifying that everything works in Mailchimp Transactional authentication and delivery.
This is where you slow down and do the job properly. Add the required DNS records at your domain host, wait for propagation, and verify the domain inside Mailchimp before switching production emails. The goal is not just to make Mailchimp accept the domain; the goal is to make Gmail, Yahoo, Outlook, and corporate mail servers see a consistent identity.
DMARC deserves special attention because inbox providers have become stricter. Google’s sender guidelines explain that DMARC tells receiving servers what to do when mail fails SPF or DKIM, and messages must pass authentication with domain alignment to satisfy DMARC checks in Google’s email sender guidelines. Even if your current sending volume is modest, building the right authentication foundation now saves you from a painful cleanup later.
Step 5: Separate Transactional Email From Marketing Email
The Mailchimp SMTP server should be used for transactional messages, not as a shortcut for promotional blasts. This distinction is not cosmetic. Transactional emails are triggered by user actions or account events, while marketing emails are audience-based campaigns that require different consent, unsubscribe, segmentation, and compliance handling.
A password reset email should not compete with a promotional campaign for reputation. A receipt should not sit in the same mental bucket as a newsletter. When you mix these streams, you make troubleshooting harder and risk damaging the deliverability of the messages customers actually need to receive.
Keep the system clean. Use Mailchimp Transactional for operational emails and use a proper marketing platform for newsletters, launches, and campaigns. If your business needs a combined CRM, funnel, and automation stack for broader customer communication, a platform like GoHighLevel can make sense outside the specific Mailchimp SMTP server workflow, especially when the business goal is pipeline management rather than pure transactional delivery.
Step 6: Map Each Email Type Before You Send
Before going live, list every email your system sends. This includes password resets, account verification, failed payment notices, invoices, form notifications, appointment confirmations, shipping updates, admin alerts, and internal notifications. The point is to know exactly what will flow through Mailchimp Transactional before real customers depend on it.
For each email type, define the sender address, reply-to address, subject pattern, template source, and triggering system. This makes your setup easier to test and much easier to debug later. When someone says “Mailchimp emails are not working,” you will know whether they mean checkout receipts, contact form alerts, user invites, or something else entirely.
This step also protects your brand experience. A customer should not receive one email from support@yourdomain.com, another from no-reply@randomtool.com, and another from an unauthenticated server name. Consistency builds trust, and with transactional email, trust is the whole game.
Professional Implementation Steps
Step 7: Build The Setup In A Staging Environment First
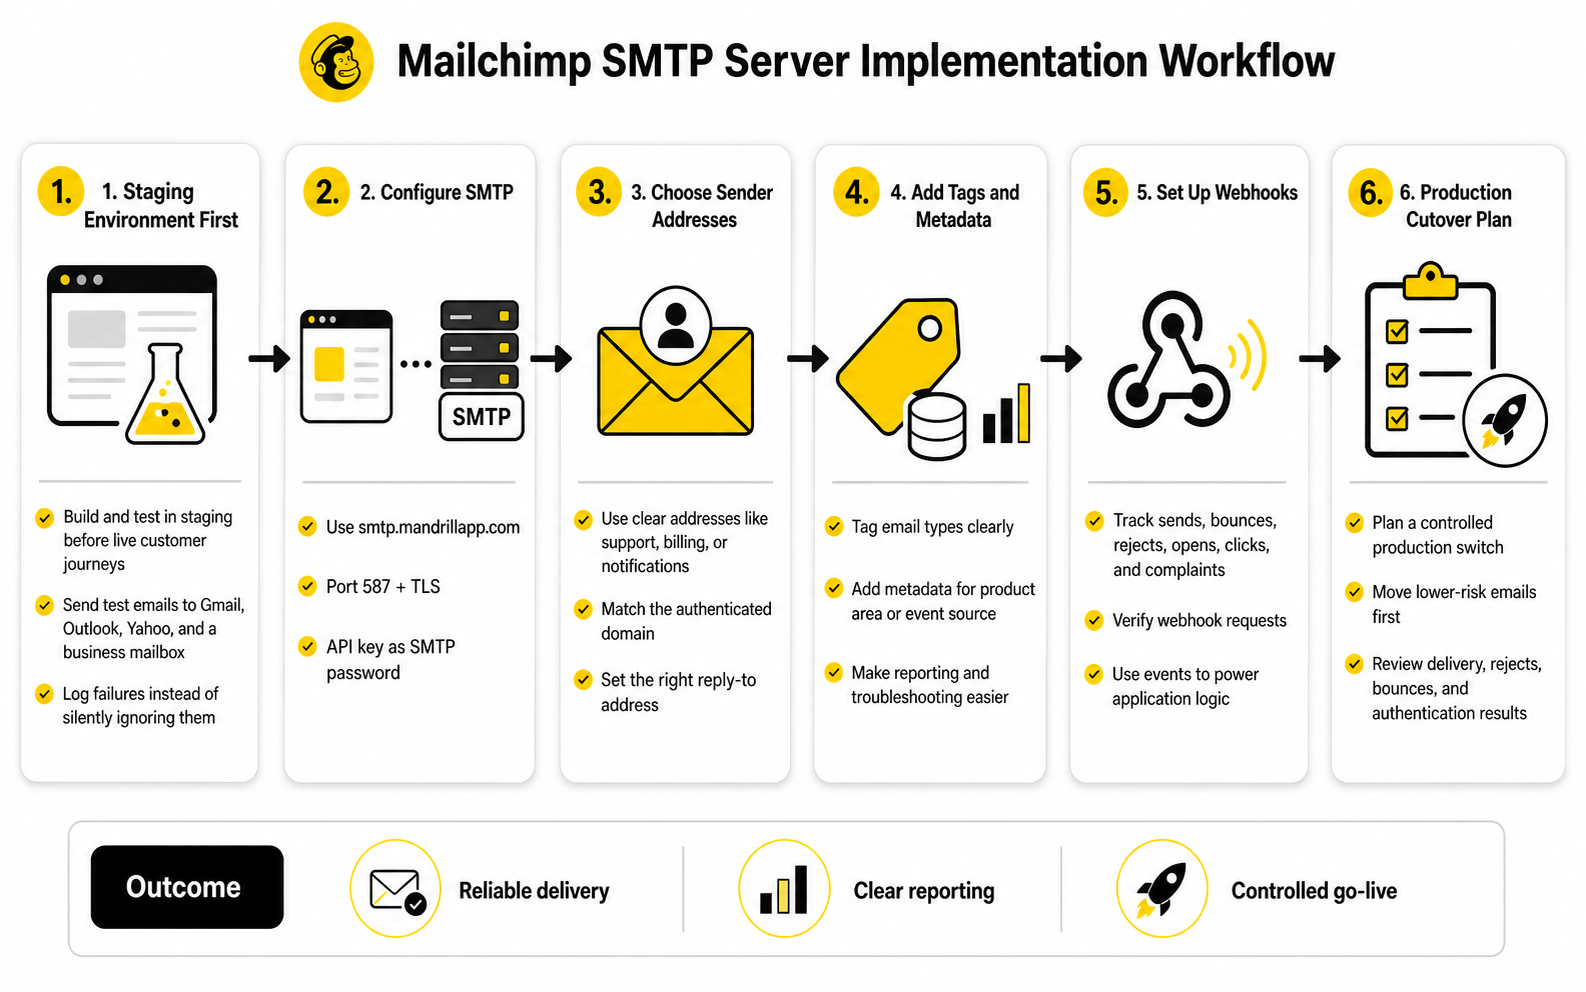
A Mailchimp SMTP server setup should never be tested for the first time on live customer journeys. Start in staging, development, or a protected test environment where mistakes do not affect real password resets, invoices, checkout receipts, or account notifications. This gives you room to confirm the connection, sender identity, templates, and logging before the system touches production traffic.
The simplest staging test is not enough. Sending one email to yourself only proves that one message reached one inbox once. A better test sends different transactional email types to Gmail, Outlook, Yahoo, and a business mailbox, then checks whether each message authenticates correctly and lands where expected.
This is where you also confirm that your app behaves properly when sending fails. A good implementation does not silently swallow SMTP errors. It logs the failure, preserves the event, and gives your team a way to retry or investigate without guessing.
Step 8: Configure SMTP Inside Your Website Or App
Once the account, domain, and DNS records are ready, connect your application to the Mailchimp SMTP server. Use smtp.mandrillapp.com as the SMTP host, choose a supported port such as 587, enable TLS, and use a valid Mailchimp Transactional API key as the password. Mailchimp’s SMTP integration guide confirms that Transactional can be used with an existing SMTP library or framework, which is why this setup works well for many websites and applications.
The exact screen will look different depending on your stack. A WordPress SMTP plugin may ask for host, encryption, port, username, and password. A Laravel, Rails, Django, Node, or PHP app may store the same values in environment variables. A CRM or form builder may hide some of the configuration behind a simple “custom SMTP” panel.
Do not paste credentials into tools you do not trust. If the platform does not explain how it stores secrets, who can view them, and whether access is restricted, be careful. Transactional email can trigger sensitive messages, so the SMTP key deserves the same respect as any other production credential.
Step 9: Choose Sender Addresses That Match The Job
Sender addresses should be boring, consistent, and easy to understand. Use addresses like support@yourdomain.com, billing@yourdomain.com, accounts@yourdomain.com, or notifications@yourdomain.com depending on the email type. Avoid sending transactional email from personal inboxes, free mailbox domains, or vague addresses that make the message look improvised.
The sender domain should match the authenticated domain you configured for Mailchimp Transactional. This helps preserve a clean identity from the user-facing “from” address through the underlying authentication checks. Google’s sender guidelines emphasize that authenticated messages help protect recipients from spoofing and phishing and are less likely to be rejected or marked as spam.
The reply-to address also matters. A password reset email can usually use a no-reply address if the rest of the customer support path is clear, but billing, support, booking, and account emails often need a monitored reply destination. Do not make customers fight your email system just to answer a legitimate message.
Step 10: Add Tags And Metadata For Clean Reporting
Mailchimp Transactional can track emails on a per-message basis, including delivery data, opens, clicks, tags, and metadata. That gives you a useful reporting layer, but only if you label messages clearly from the start. If every message is simply “transactional,” your reporting will be technically available but practically weak.
Use tags for the main email categories. For example, separate password resets, receipts, account verification emails, failed payment notices, and appointment confirmations. Use metadata for useful context such as product area, environment, customer segment, or internal event name when your system supports it.
This pays off when something goes wrong. Instead of asking whether “emails are down,” you can check whether only one template, one domain, one provider, or one workflow is affected. That is the difference between professional diagnosis and random button-clicking.
Step 11: Set Up Webhooks For Important Email Events
SMTP sends the message, but your app still needs to know what happened after that. Mailchimp Transactional webhooks allow your application to receive email events as they occur and respond to them automatically. This is especially useful for bounces, rejects, complaints, opens, clicks, and delivery-related events.
For simple websites, you may not need a full webhook system on day one. For SaaS products, ecommerce stores, marketplaces, membership platforms, and booking systems, webhooks become more important because email status can affect the customer experience. If an invoice email bounces or an account invite is rejected, your team should know before the customer complains.
Security matters here too. Mailchimp’s webhook guide explains that Transactional includes an X-Mandrill-Signature header so applications can verify that webhook requests are legitimate. Do not build webhooks that accept any incoming request blindly, because fake event data can create real operational problems.
Step 12: Create A Production Cutover Plan
When staging tests look clean, plan the production switch instead of improvising it. Choose a low-risk window, document the old sending method, save the new SMTP settings securely, and make sure someone can roll back if delivery behaves unexpectedly. This is not dramatic; it is just adult implementation.
Start with a controlled set of email types if your system allows it. For example, move internal notifications or low-risk confirmations first, then password resets and billing emails after you verify production behavior. Watch the first few hours closely because configuration issues usually show themselves quickly.
After the switch, check actual delivery data rather than relying on user silence. Mailchimp Transactional handles and reports bounces automatically, and when a recipient email bounces, future email to that address may be temporarily rejected. Review rejects, bounces, and authentication results early so you can fix issues while they are still small.
Statistics And Data
What Mailchimp SMTP Server Metrics Actually Tell You
The point of Mailchimp SMTP server analytics is not to stare at dashboards. The point is to know whether your transactional email system is helping customers complete important actions without friction. If a password reset, order confirmation, invoice, or login code fails, the business impact is immediate even if the rest of your marketing looks fine.
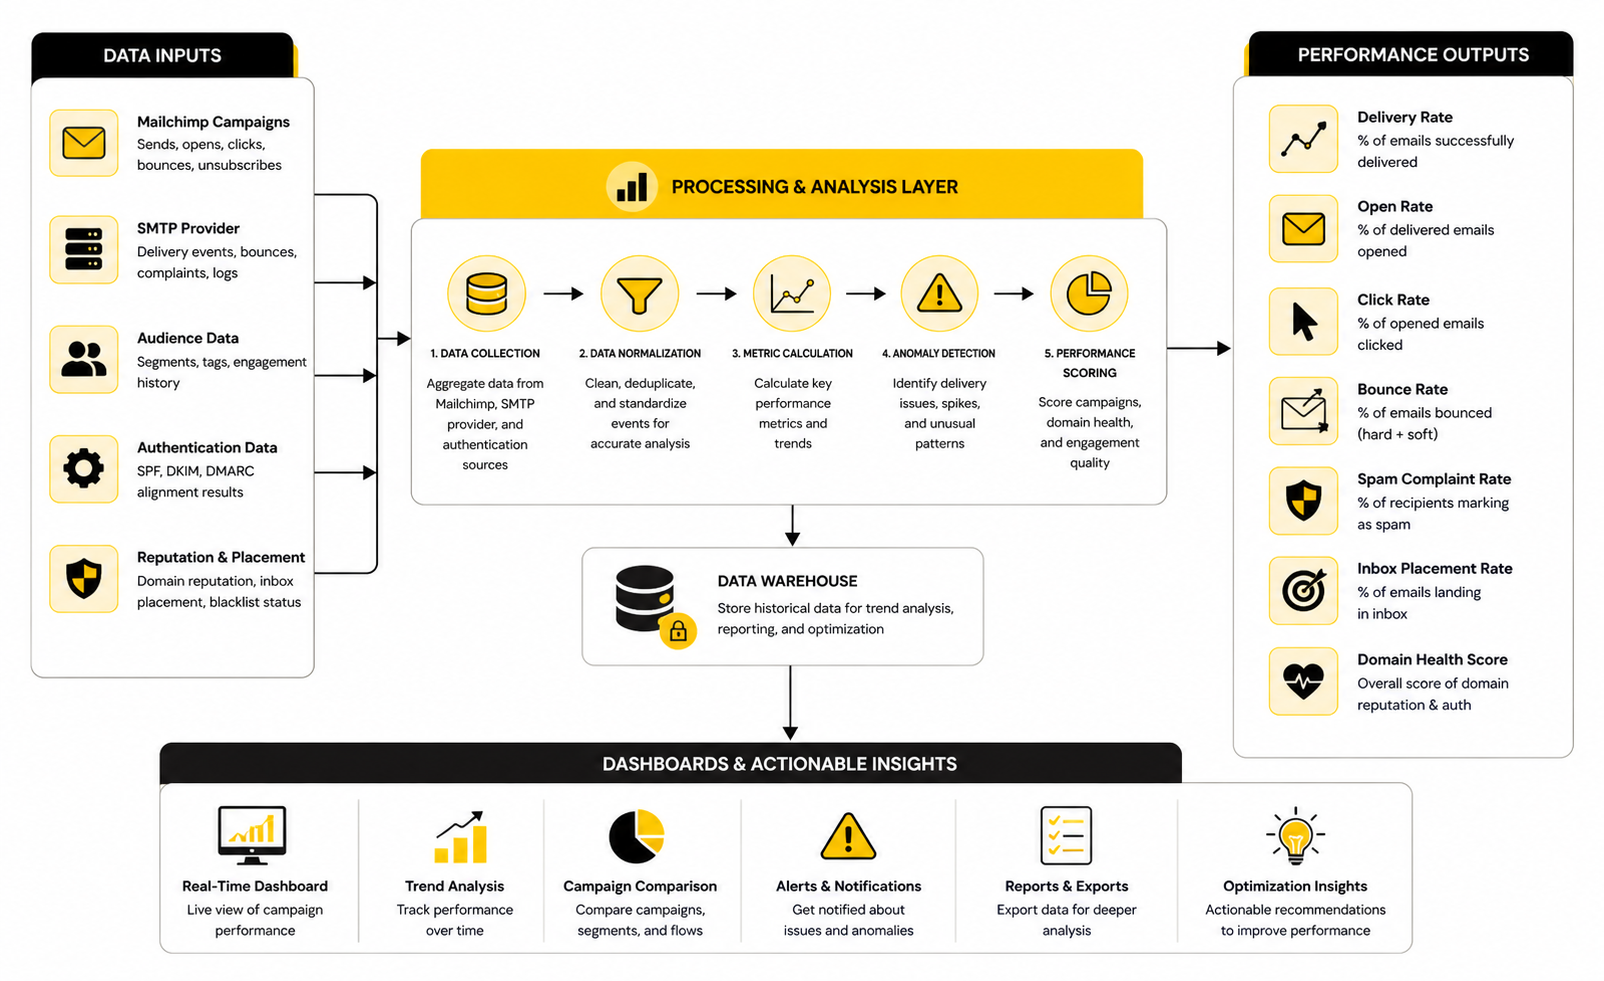
Mailchimp Transactional tracks emails on a per-message basis, including opens, clicks, delivery data, tags, and metadata through its activity and reports documentation. That gives you the raw material for useful measurement, but raw data only becomes useful when you connect it to decisions. A bounce is not just a bounce; it may mean a bad address, a stale account, a typo, a blocked domain, or a sender reputation issue.
The key is to measure by email type, not just at the account level. A 98% delivery rate across all transactional email may look healthy, but it can hide a broken account-invite workflow or a high bounce rate on failed payment notices. Segment the data by tag, template, sending domain, and event type so the numbers tell you where to act.
The Core Metrics Worth Watching
Start with delivery rate, bounce rate, rejection rate, spam complaints, opens, clicks, and time-sensitive failures. Mailchimp Transactional reporting includes fields such as status, tags, opens, clicks, and bounce detail in activity exports, which makes it possible to analyze performance beyond a surface-level send count. For a Mailchimp SMTP server setup, that is the difference between “emails are sending” and “the right emails are reliably reaching people.”
Delivery rate tells you whether messages are being accepted by recipient servers. Bounce rate tells you whether addresses, domains, or mailbox conditions are causing delivery failures. Rejection rate tells you whether Mailchimp Transactional is preventing sends because of prior bounces, unsubscribes, spam complaints, or other rejection-list behavior.
Opens and clicks are useful, but they should not be treated as perfect truth. Apple Mail Privacy Protection and similar privacy changes can distort open tracking, so opens are better used as directional signals than absolute proof that a customer read the message. Clicks are often more meaningful for transactional emails because they show whether people are taking the intended action, such as confirming an account, viewing an invoice, or resetting a password.
Benchmarks Should Drive Action, Not Ego
Benchmarks are helpful only when they tell you what to fix. A transactional email system should generally perform better than promotional email because the recipient usually expects the message and has a direct reason to open it. But that does not mean you should chase generic benchmarks without context.
A password reset email should be judged differently from a receipt, and a receipt should be judged differently from a shipping update. If password reset clicks drop, that may point to a broken link, confusing subject line, delayed delivery, or a template issue. If receipts have a rising bounce rate, that may point to low-quality account data or checkout forms allowing bad email addresses through.
Use your own baseline as the real benchmark. Track the first 30 days after implementation, then compare future changes against that baseline. If a metric moves sharply after a DNS change, template change, plugin update, domain migration, or checkout redesign, investigate that event before blaming Mailchimp.
Authentication Data Is A Deliverability Signal
Authentication is not just a setup task from earlier in the article. It is also a measurement category. Google’s sender requirements state that all senders need SPF or DKIM, while bulk senders need SPF, DKIM, and DMARC, and authenticated messages are less likely to be rejected or marked as spam in Google’s email sender guidelines.
Yahoo’s sender guidance also requires bulk senders to authenticate mail with SPF and DKIM and publish a valid DMARC policy with at least p=none in its sender best practices. Even if your Mailchimp SMTP server sends mostly transactional emails, this matters because inbox providers evaluate domain trust across the broader mail ecosystem. Weak authentication can turn a technically correct SMTP setup into a deliverability headache.
Check authentication results in real inbox headers during testing and after major changes. If SPF, DKIM, or DMARC stops passing, treat that as a production issue, not a future cleanup task. A beautiful transactional email template is useless if receiving servers cannot verify that it really came from your domain.
Bounce And Rejection Data Need Different Responses
Bounces and rejections are related, but they are not the same problem. A bounce usually means the recipient server did not accept the message, while a rejection in Mailchimp Transactional can happen because the address is already on a rejection list. Mailchimp’s rejection documentation explains that soft bounces may expire after 24 hours, hard bounces after seven days, and spam complaints or unsubscribes after a year in reputation and rejections.
That timing matters. If you keep trying to send to bad addresses, you are not being persistent; you are training the system that your list quality is poor. For operational email, the smart move is to capture failed delivery events, flag the user record, and prompt the customer to update their email address through a reliable channel.
Do not manually remove rejections just because someone complains. First, identify why the address was rejected. If it was a typo that has been corrected, fine. If it was a spam complaint or repeated hard bounce, forcing more email through can damage your sender reputation.
Timing Metrics Reveal Customer Experience Problems
Transactional email is often time-sensitive. A password reset that arrives fifteen minutes late may technically be delivered, but it still fails the customer. A two-factor authentication code that arrives after the code expires is not a delivery success in any practical sense.
Measure the time between user action, message generation, SMTP handoff, delivery event, and user click when your stack allows it. Mailchimp Transactional can give you email-side activity, while your app should log the customer-side event that triggered the message. When you connect both, you can see whether delays come from your app, the SMTP handoff, provider processing, recipient server behavior, or the user journey itself.
This is especially important for ecommerce, SaaS, memberships, and booking flows. If customers abandon a flow because the email arrives too late, the problem may show up as conversion loss rather than an obvious email error. That is why email analytics should sit next to product analytics, not in a forgotten admin tab.
Tags And Metadata Turn Reports Into Decisions
Tags and metadata are what make Mailchimp SMTP server reporting useful at scale. Without them, everything becomes one big pile of transactional activity. With them, you can separate account verification from billing notices, admin alerts, booking confirmations, onboarding messages, and security emails.
Use tags for categories that humans will review. Use metadata for details that systems may need later, such as environment, customer plan, product area, store ID, workflow name, or internal event source. Keep naming consistent because messy tags create messy reports.
This also helps when you export activity data. Mailchimp’s API reference shows activity exports can include date, email address, sender, subject, status, tags, opens, clicks, bounce detail, and custom metadata when configured. That gives your team a practical way to review patterns, investigate incidents, and prove whether fixes actually worked.
The Best Analytics Routine Is Simple
You do not need a complicated reporting ritual. Review high-risk transactional email daily during the first week after launch, then move to a weekly review once performance is stable. Watch delivery, bounce, rejection, complaint, and click-through behavior by email type.
Set thresholds that trigger action. For example, investigate immediately if password reset delivery drops, if bounce rates spike after a form change, if a sender domain fails authentication, or if a specific template produces unusual rejects. The threshold matters less than the discipline of responding quickly.
The goal is boring reliability. When the Mailchimp SMTP server is configured well and measured properly, transactional email becomes quiet infrastructure that supports the business instead of constantly creating support tickets. That is exactly what you want.
Testing, Monitoring, And Troubleshooting
Build A Failure Plan Before You Need One
A serious Mailchimp SMTP server setup needs a failure plan, not just a working test email. Transactional email is tied to account access, billing, onboarding, and customer trust, so “we will check it when someone complains” is not good enough. You need to know what happens when SMTP authentication fails, DNS records break, a recipient server rejects mail, or your application queues more email than expected.
Start by defining which emails are business-critical. Password resets, login codes, billing notices, account invitations, and purchase receipts deserve faster alerts than low-priority admin notifications. When everything is treated as urgent, nothing is actually operationally clear.
The best troubleshooting systems are boring and specific. Log the triggering event, email type, recipient domain, SMTP response, Mailchimp message status, tag, metadata, and retry result. When support asks why a customer did not receive an email, your team should be able to answer from evidence instead of guessing.
Understand Hourly Quotas And Reputation Pressure
Mailchimp Transactional uses reputation and hourly quota as part of its sending model. Its reputation and rejections documentation explains that every account has a reputation, and that spam complaints, bounces, unsubscribes, and failed content reviews are major factors. That means scaling is not just about buying more email volume; it is about proving that your mail is wanted, authenticated, and clean.
This matters when your application sends email in bursts. A product launch, Black Friday sale, large import, failed cron job, or accidental retry loop can suddenly create volume patterns your normal reputation does not support. If your app generates a spike and then keeps retrying aggressively, you can make a temporary problem much worse.
Design your sending system to respect limits. Queue non-urgent messages, retry intelligently, and separate critical email from lower-priority operational noise. A good Mailchimp SMTP server implementation protects the messages customers truly need first.
Decide When Shared IPs Are Enough
Many teams do not need a dedicated IP at the beginning. Shared IPs can work well when your volume is modest, your email quality is high, and your sending patterns are steady. The mistake is thinking a dedicated IP is automatically more professional.
A dedicated IP gives you more control over sender reputation, but it also gives you more responsibility. Mailchimp’s dedicated IP documentation explains that dedicated IPs are associated with high-volume sending and sender reputation management. If you do not have enough consistent, high-quality volume, a dedicated IP can be harder to manage than a shared pool.
Use a dedicated IP when your volume, compliance needs, or deliverability strategy genuinely justify it. Do not buy one as a superstition. Deliverability is earned through authentication, engagement, complaint control, bounce control, and consistency.
Warm Up Dedicated IPs Gradually
If you do move to a dedicated IP, warm it up properly. Mailchimp’s Transactional API reference says its IP warmup process gradually increases the percentage of mail sent over the warming IP over roughly 30 days in the dedicated IP warmup documentation. That gradual process exists because inbox providers do not instantly trust a new sending IP.
Do not treat warmup as a delay to bypass. Sending too much too quickly from a new IP can create reputation problems before the IP has any positive history. The more carefully approach is to send consistent, expected, high-engagement transactional email first and let the reputation build.
During warmup, watch bounces, complaints, delivery delays, and provider-specific patterns closely. If Gmail looks healthy but Outlook starts delaying messages, that is useful information. Warmup is not only a schedule; it is a feedback loop.
Use Subaccounts For Separation When The Business Gets More Complex
Subaccounts are useful when one Mailchimp Transactional account supports different clients, brands, products, teams, or tenants. Mailchimp’s guide to managing users with subaccounts explains that subaccounts can separate reputation, activity, reports, and quotas across different senders under one account. That separation becomes valuable when one sender’s behavior should not blur the reporting or controls for another.
Agencies should pay close attention here. If one client has poor list hygiene, broken forms, or high complaint risk, you do not want that mess hiding inside the same reporting view as a clean client. Subaccounts make it easier to see where problems actually live.
Multi-tenant SaaS products can use the same logic. A tenant sending account invitations and billing notices should not be analyzed the same way as another tenant sending onboarding updates or marketplace notifications. Separation keeps operations clearer and makes customer-specific troubleshooting much faster.
Know When SMTP Stops Being Enough
SMTP is convenient, but it is not always the final architecture. As your system grows, you may need tighter template control, richer metadata, deeper reporting, scheduled sending, inbound processing, or more precise failure handling. Mailchimp’s outbound email documentation points developers toward API endpoints such as message sending and template-based sending when they need more programmatic control.
The decision is not “SMTP bad, API good.” The decision is about fit. SMTP is excellent when you need broad compatibility with existing tools, while the API is stronger when email behavior becomes part of your product logic.
A practical path is to start with the Mailchimp SMTP server for standard transactional workflows, then migrate selected flows to the API when the business case is clear. For example, a basic contact form can stay on SMTP, while account lifecycle emails, customer-specific templates, and event-driven product notifications may deserve API-level control.
Keep Template Logic Under Control
Transactional templates should be clear, stable, and easy to audit. Mailchimp Transactional supports templates and dynamic content, including conditional merge tags, as described in its templates and dynamic content documentation. That flexibility is useful, but it can also create a hidden logic layer that nobody owns.
Do not let templates become a second application. If business logic belongs in your product, keep it in your product and pass clean variables into the email. Templates should present the message clearly, not decide complex customer states.
Version important templates and document what each variable means. When a billing email, security email, or legal notification changes, you want a clear review trail. Transactional email may feel small, but customers often treat these messages as official records.
Use Rules Carefully
Mailchimp Transactional includes a rules engine that can change sending behavior when messages match specific criteria. Its rules engine documentation describes rules as a way to take actions based on searchable criteria in the account. That can be powerful for routing, tagging, rejecting, or changing behavior under controlled conditions.
The risk is silent complexity. A rule that made sense six months ago can confuse troubleshooting today if nobody remembers it exists. When an email does not behave as expected, rules are one of the first places to check.
Use rules for clear operational policies, not as a dumping ground for random exceptions. Name them clearly, review them regularly, and document why they exist. If a rule affects critical email, it should be treated like production configuration.
Protect Customer Trust During Scaling
Scaling transactional email is not only a technical exercise. It is a trust exercise. Customers expect account, payment, security, and booking emails to be accurate, timely, and easy to recognize.
That means your Mailchimp SMTP server setup should scale with governance. Limit who can change sender domains, API keys, templates, rules, and webhook endpoints. Review changes before they affect production and keep a rollback path for high-risk workflows.
The final advanced principle is simple: do not optimize for sending more email until you can prove the current email is clean. Strong authentication, controlled credentials, useful tagging, bounce handling, subaccount separation, and measured scaling will do more for deliverability than any magic setting. The boring work wins.
Mailchimp SMTP Server FAQ And Final Recommendations
A Mailchimp SMTP server setup works best when it is treated as a complete system. The server credentials matter, but so do authentication, DNS, templates, logs, webhooks, reporting, security, and the way your team responds when something breaks. Transactional email is not just a technical feature; it is part of the customer experience.
At this stage, the goal is simple. Keep critical emails reliable, protect sender reputation, and make every important message easy to trace. When the system is built this way, you are not hoping emails work. You know how they work, where they fail, and what to fix.
What Is The Mailchimp SMTP Server?
The Mailchimp SMTP server is the SMTP relay used by Mailchimp Transactional, the product many people still associate with Mandrill. The SMTP host is smtp.mandrillapp.com, and Mailchimp’s documentation confirms that Transactional can be connected to existing SMTP libraries, frameworks, and tools through its SMTP integration guide. This lets your website or app hand transactional messages to Mailchimp instead of sending them directly from your own server.
Is Mailchimp SMTP The Same As Regular Mailchimp Email Marketing?
No, and this distinction matters. Regular Mailchimp is mainly built for marketing campaigns, newsletters, audiences, and promotional communication. Mailchimp Transactional is built for one-to-one operational messages such as password resets, receipts, alerts, verification emails, and account notifications.
What SMTP Host Should I Use For Mailchimp Transactional?
Use smtp.mandrillapp.com as the SMTP host. Mailchimp’s SMTP documentation lists common ports including 25, 587, 2525, and 465 for SSL, but port 587 with TLS is usually the clean starting point for modern authenticated SMTP. If your hosting provider blocks a port, try another supported port instead of forcing the blocked one.
What Username And Password Do I Use?
For SMTP authentication, the password is a valid Mailchimp Transactional API key. Mailchimp’s SMTP guide explains that users can authenticate with Transactional credentials, and the API key is what proves your application is allowed to send. Store that key securely and do not reuse it casually across every tool you own.
Do I Need To Verify My Domain Before Sending?
Yes. Mailchimp says you need to authenticate your sending domain with DKIM and DMARC records and verify ownership before sending through Mailchimp Transactional in its authentication and delivery documentation. This is not optional housekeeping; it is the trust layer that helps inbox providers recognize your email as legitimate.
Why Does DMARC Matter For A Mailchimp SMTP Server Setup?
DMARC helps receiving mail servers decide what to do when a message fails SPF or DKIM checks. Google’s sender guidelines explain that messages must pass authentication with domain alignment to pass DMARC, and Yahoo also urges senders to use SPF, DKIM, and DMARC in its sender best practices. For a business, this means DMARC is part of both deliverability and brand protection.
Can I Use Mailchimp SMTP For Newsletters?
You should not use Mailchimp SMTP as a workaround for newsletters or promotional campaigns. Transactional email is designed for user-triggered, one-to-one messages, while newsletters belong in a marketing email platform with audience management, consent, unsubscribe handling, and campaign reporting. Mixing the two can create compliance problems and make reputation issues harder to diagnose.
Why Are My Mailchimp SMTP Emails Going To Spam?
Spam placement can come from several causes, including weak authentication, poor sender reputation, misleading content, high bounces, complaints, or inconsistent sending behavior. Start by checking whether DKIM and DMARC pass, then review bounces, rejects, complaints, and message content. Mailchimp’s reputation documentation makes it clear that spam complaints, bounces, unsubscribes, and failed content reviews all affect reputation in reputation and rejections.
How Do I Test Whether Mailchimp SMTP Is Working?
Send test emails from the actual system that will use SMTP, not just from a generic testing screen. Test several email types, several inbox providers, and at least one business mailbox. Then inspect the message headers for SPF, DKIM, and DMARC results so you are not relying only on whether one message appeared in your inbox.
Should I Use SMTP Or The Mailchimp Transactional API?
Use SMTP when compatibility is the priority. It works well with WordPress SMTP plugins, ecommerce tools, CRMs, older applications, and frameworks that already support SMTP configuration. Use the API when you need deeper programmatic control over templates, events, metadata, reporting, or product-specific email workflows.
Does Mailchimp SMTP Support Webhooks?
Yes, Mailchimp Transactional supports webhooks for message events such as sends, bounces, rejects, opens, clicks, and complaints. Webhooks are useful because SMTP alone does not automatically tell your application what happened after the message was handed off. If your business depends on account invites, billing messages, or security emails, event tracking should become part of the setup.
What Should I Track After Going Live?
Track delivery rate, bounce rate, rejection rate, spam complaints, authentication results, time to delivery, opens, clicks, and workflow-specific failures. The most useful reporting comes from clean tags and metadata because they let you separate password resets from receipts, invoices, account verification, and other transactional flows. Do not judge the whole setup from one blended account-level number.
Do I Need A Dedicated IP For Mailchimp SMTP?
Not always. A dedicated IP can help high-volume senders control reputation more directly, but it also requires careful warmup and ongoing management. Many smaller or steadier senders are better served by focusing first on clean authentication, low complaints, low bounces, consistent sending, and strong template quality.
What Is The Biggest Mistake People Make With Mailchimp SMTP?
The biggest mistake is treating SMTP as just a host, port, username, and password. That view ignores the parts that actually determine reliability: domain authentication, DMARC alignment, sender reputation, bounce handling, logging, testing, and monitoring. The Mailchimp SMTP server is only one layer of the system.
What Is The Best Final Setup?
The best setup uses Mailchimp Transactional for the right email types, authenticates the sending domain properly, stores credentials securely, tags messages clearly, logs failures, tracks events, and reviews deliverability signals regularly. It also keeps transactional email separate from marketing campaigns. Simple, clean, and controlled wins almost every time.
Build a stronger local presence with BAAM AI
Turn your website, Google profile, social channels, and AI visibility into one growth engine
Most businesses do not need more random marketing activity. They need a consistent presence system that helps the right people find them, trust them, and take action. BAAM AI brings strategy, local SEO, website updates, Google Maps visibility, social content, AI-search readiness, media production, and reporting into one practical monthly engine.
If you want your marketing to keep working after the campaign ends, start with a free BAAM AI presence audit. See how your business shows up today and where the fastest visibility wins are at BAAM AI.