BAAM AI Blog
Mailchimp Send Email To New Subscribers: A Practical Automation Guide
When someone joins your email list, the first message they receive matters more than most brands admit. That subscriber just raised their hand, trusted you with their inbox, and gave you a small window of attention...
When someone joins your email list, the first message they receive matters more than most brands admit. That subscriber just raised their hand, trusted you with their inbox, and gave you a small window of attention. The fastest way to waste that moment is to leave them waiting until your next newsletter.
That is why learning how to make Mailchimp send email to new subscribers is not just a technical setup task. It is the foundation of your welcome system, your lead nurturing flow, and often your first conversion opportunity. Mailchimp supports this through automation flows that can use triggers, branches, tags, and email actions to build a path for new contacts as soon as they join your audience, as explained in Mailchimp’s guide to marketing automation flows.
A strong welcome email does not need to be complicated. It needs to confirm the subscription, set expectations, deliver any promised lead magnet, and move the reader toward the next useful action. Mailchimp’s own guidance on welcome email series frames this kind of automation as a way to greet new subscribers, thank first-time buyers, and introduce what makes the brand worth following.
Why Sending an Email to New Subscribers Matters
A new subscriber is usually warmer than a random website visitor, but that attention fades quickly. They may have signed up for a discount, a checklist, a webinar, a newsletter, or a product update. If the first email arrives instantly and feels relevant, you reinforce the reason they subscribed in the first place.
This is where automation beats manual sending. Mailchimp’s automation flow builder lets you start a flow from a trigger and then send targeted emails, apply tags, and create a more personalized path for contacts, as shown in its guide on how to create a marketing automation flow. In plain English, the system watches for the signup event and sends the right email without you needing to remember anything.
The business case is simple: your welcome email is not just a polite hello. It can protect deliverability by setting expectations, reduce confusion by explaining why the person is receiving emails, and guide the subscriber toward the next step while intent is still fresh. Mailchimp also emphasizes permission and consent as a core part of email marketing compliance, including making sure contacts have agreed to receive marketing from you in its guide on email marketing compliance.
The Mailchimp Welcome Automation Framework
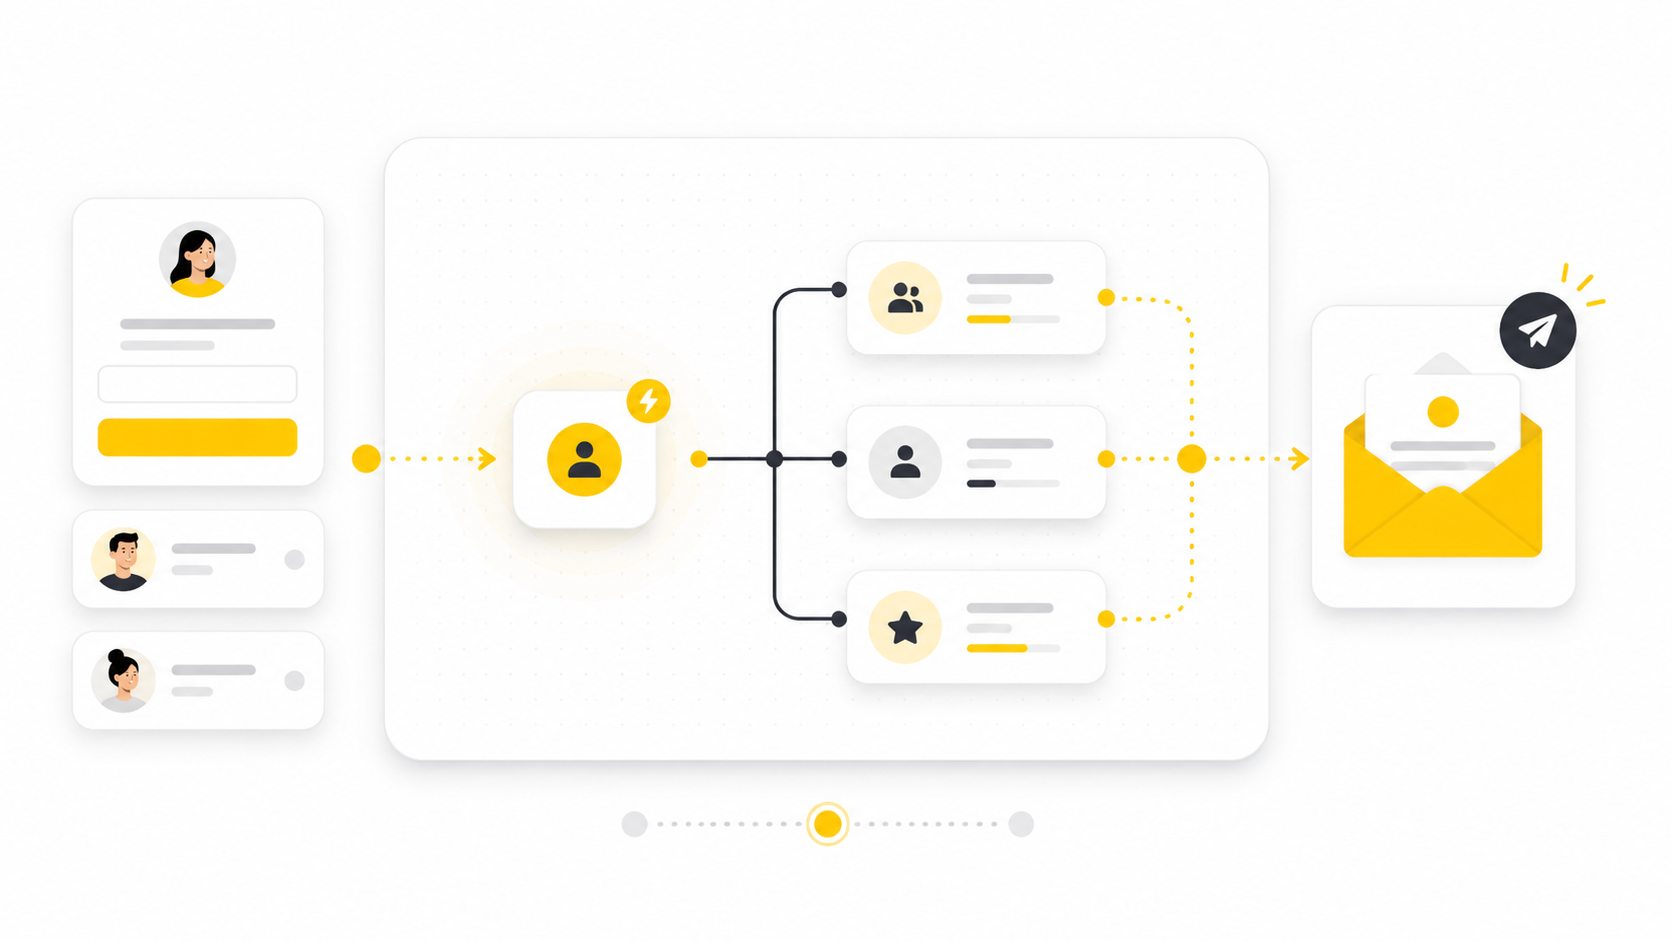
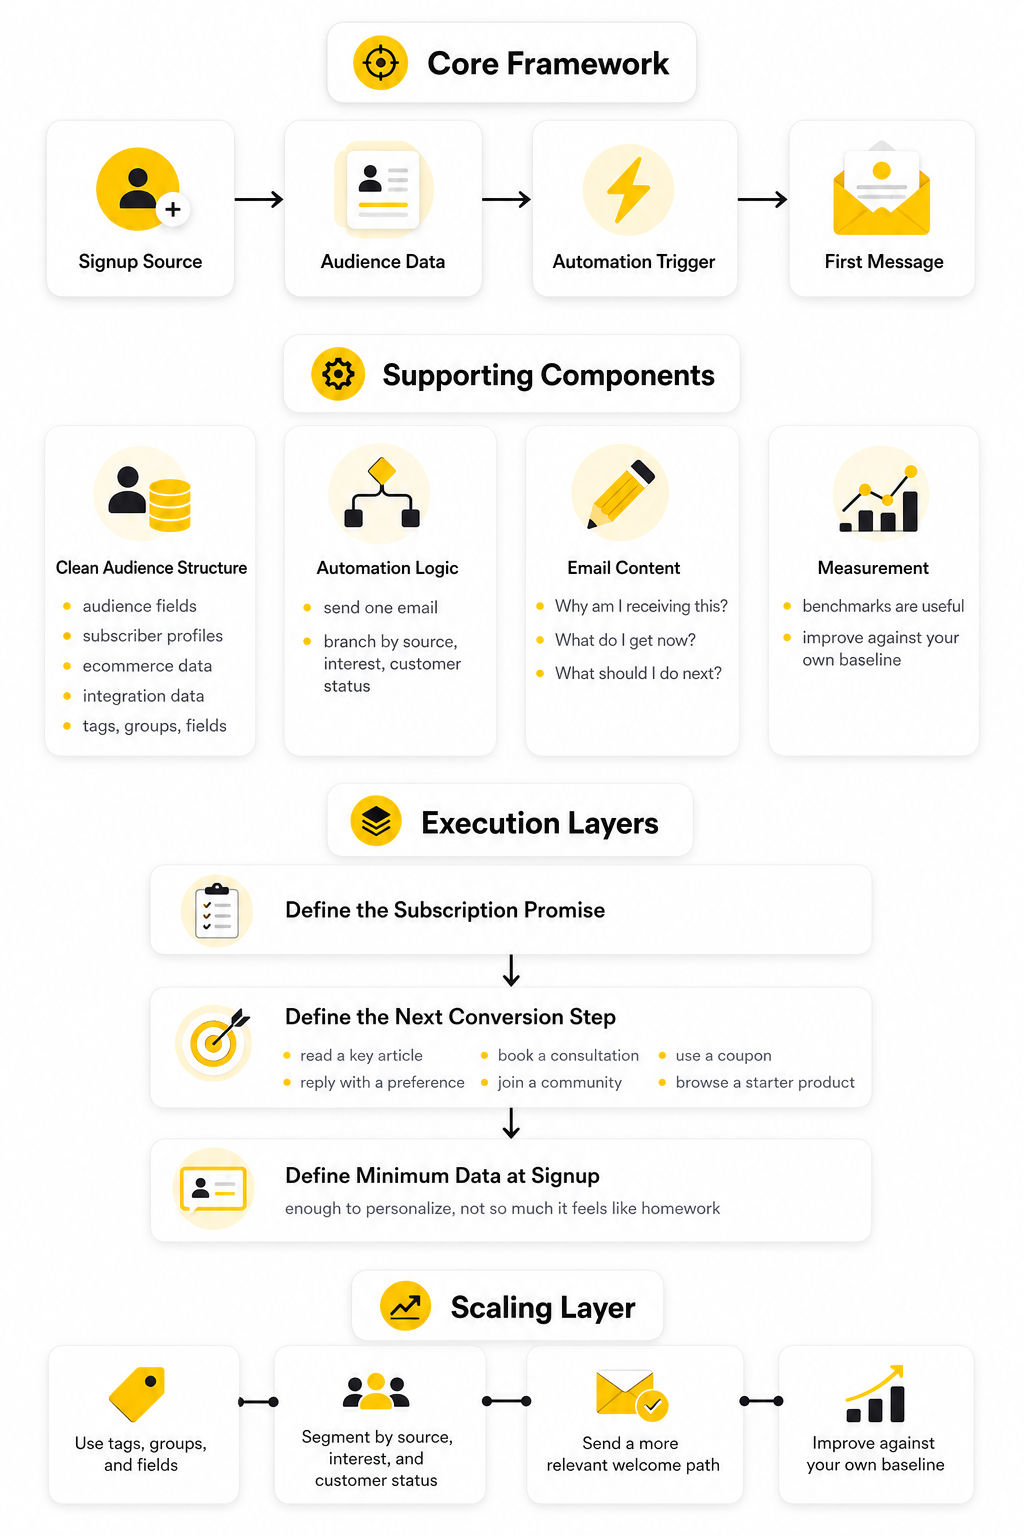
A reliable Mailchimp send email to new subscribers setup has four moving parts: the signup source, the audience data, the automation trigger, and the first message. The signup source is where the person joins, such as a Mailchimp form, landing page, embedded form, checkout integration, or third-party form. The audience data is what Mailchimp stores about that person, including email address, tags, fields, groups, consent status, and any source details you capture.
The trigger is the rule that starts the automation. Mailchimp describes triggers as events or actions that add contacts to a marketing automation flow, and its trigger options include signup-related events, contact activity, purchases, dates, and other conditions in the guide to automation flow triggers. For this guide, the most important trigger is the one that starts when a contact subscribes or enters the relevant audience condition.
The first message is where most people overthink or underthink the process. It should not be a generic “thanks for subscribing” email with no next step. It should welcome the person, deliver what was promised, explain what they will receive next, and make one clear ask.
Core Components of the Full Setup
The full setup starts with clean audience structure. Mailchimp lets you use audience fields, subscriber profiles, ecommerce data, and integration data to filter contacts into segments, with segment conditions documented in its guide to segmenting options. That matters because “new subscriber” is not always one type of person.
A blog subscriber, ecommerce discount subscriber, lead magnet subscriber, and webinar registrant may all be new, but they do not all need the same welcome email. This is why tags, groups, and fields should be planned before the automation is built. If you only collect an email address and nothing else, your welcome flow has very little context to work with.
The second component is the automation logic itself. A basic version sends one email after signup. A stronger version checks the subscriber’s source, interest, or customer status, then sends a more relevant first message or branches them into the right welcome path.
The third component is the email content. The best first email is specific, useful, and easy to act on. It should answer three questions quickly: “Why am I receiving this?”, “What do I get now?”, and “What should I do next?”
The fourth component is measurement. Mailchimp publishes email benchmarks by industry, including open rate, click rate, bounce rate, and unsubscribe rate, through its email marketing benchmarks. Benchmarks are useful, but they are not the goal. The real goal is to improve your own welcome flow against your own baseline.
Professional Implementation Starts Before You Click Create
Most bad welcome automations fail before anyone opens Mailchimp. The problem is not the button sequence. The problem is that the business has not decided what should happen after someone subscribes.
Before building the automation, define the subscription promise. If someone signed up for a PDF, the first email should deliver it. If someone joined a newsletter, the first email should explain the publishing rhythm and the type of value they can expect.
Then define the next conversion step. That step could be reading a key article, booking a consultation, using a coupon, replying with a preference, joining a community, or browsing a starter product. Keep it focused because a first email with five competing calls to action usually creates hesitation instead of movement.
Finally, define the minimum data you need at signup. Mailchimp’s guide to audience and signup form fields explains that fields can collect information when someone subscribes or when contacts are imported. Use that carefully. Ask for enough information to personalize the experience, but not so much that the form feels like homework.
The Mailchimp Welcome Automation Framework
The cleanest way to make Mailchimp send email to new subscribers is to stop thinking in terms of “one email” and start thinking in terms of a small system. A new subscriber enters through a form, Mailchimp stores that contact inside an audience, a trigger starts the automation, and the first message goes out based on the rules you set. That system can be simple, but it should never be random.
Mailchimp’s automation flows are designed around this exact logic. A flow can start when a contact meets a trigger condition, then continue through actions such as sending an email, adding a tag, waiting for a period of time, or splitting contacts into different paths. Mailchimp explains this as a way to create automated paths for contacts using its marketing automation flow builder.
The practical advantage is control. Instead of blasting every new person with the same generic message, you can decide what should happen based on how they joined, what they asked for, and what you want them to do next. That is the difference between a basic welcome email and a welcome system that actually supports growth.
Start With the Signup Source
The signup source is the place where the subscriber joins your list. It might be a Mailchimp embedded form on your website, a Mailchimp landing page, an ecommerce checkout, a webinar registration form, a lead magnet page, or a third-party form connected through an integration. This matters because the signup source tells you why the person joined.
Someone who subscribes from a blog footer is probably in research mode. Someone who joins from a discount popup may be closer to buying. Someone who signs up for a webinar needs confirmation, context, and reminders rather than a broad brand introduction.
Do not treat these people as identical just because they are all “new subscribers.” The better move is to capture source context and use it to shape the first message. Even a simple tag like “lead magnet checklist,” “newsletter footer,” or “discount popup” can make the automation far more relevant.
Use One Audience Unless You Have a Strong Reason Not To
Many beginners create too many Mailchimp audiences because it feels organized at first. One audience for buyers, one for newsletter subscribers, one for leads, one for webinar signups, and so on. The problem is that this can quickly create duplicate contacts, messy reporting, and unnecessary complexity.
In most cases, one main audience with good tags, groups, and segments is easier to manage. Mailchimp’s own contact organization model supports this approach because tags are custom labels for organizing contacts, while segments filter contacts based on audience data, engagement, ecommerce activity, and other conditions. Mailchimp’s developer guide explains that tags help bring your own targeting strategy into Mailchimp.
This is important when setting up a Mailchimp send email to new subscribers flow. The automation trigger can add people based on subscription activity, but the tags and fields help determine what they should receive next. Without that structure, every subscriber gets pushed through the same path whether it fits or not.
Define the Trigger Carefully
The trigger is the event that starts the automation. For a new subscriber flow, the obvious trigger is a contact subscribing to an audience or entering a signup-related condition. Mailchimp’s trigger documentation shows that automation flows can start from different contact actions, signup events, ecommerce activity, date-based events, and other criteria in its list of marketing automation flow triggers.
This is where precision matters. If the trigger is too broad, people may receive the welcome email when they should not. If it is too narrow, some subscribers may never enter the flow at all.
A good trigger answers three questions before the automation is turned on:
That last question is easy to overlook. If someone unsubscribes, resubscribes, downloads another lead magnet, or updates their preferences, you need to know whether the welcome email should fire again. For many businesses, the first welcome sequence should happen once, while specific lead magnet delivery emails can happen whenever the person requests that asset.
Match the First Email to the Subscriber’s Intent
The first email should match the promise that created the signup. If the form promised a checklist, deliver the checklist. If the form promised a discount, make the offer clear. If the form promised weekly advice, explain what kind of advice is coming and why it is worth opening.
This sounds obvious, but many welcome emails fail because they talk about the brand too early. The subscriber does not need your full company history in the first message. They need proof that subscribing was a good decision.
A strong first email usually does four things in order. It confirms the subscription, delivers the promised value, sets expectations, and gives one next step. Keep the structure tight because the first email is not the place to ask people to read five links, follow every social channel, book a call, and buy a product all at once.
Decide Whether You Need One Email or a Short Series
A single welcome email is fine when the signup promise is simple. For example, a newsletter confirmation, a basic content update list, or a straightforward discount delivery may not need a long sequence. In those cases, the goal is speed, clarity, and a clean handoff into your regular email calendar.
A short series makes more sense when the subscriber needs education before taking action. This is common for services, high-ticket offers, B2B products, software trials, paid communities, courses, and ecommerce brands with multiple product categories. Mailchimp’s classic automation resources also describe welcome automations as a way to help new subscribers get to know you and send follow-up emails based on subscriber activity in its guide to classic automation types.
The safest structure is usually three to five emails, not fifteen. Email one delivers the promise. Email two explains the main problem or opportunity. Email three builds trust and moves the subscriber toward the next step. Extra emails should only exist if they genuinely help the reader make a better decision.
Core Components of a New Subscriber Email Flow
A good new subscriber flow is built from a few core components. You do not need to make it complicated, but each component should have a job. When every part has a job, the automation feels intentional instead of stitched together.
The main components are audience data, entry rules, message timing, email content, segmentation logic, and performance tracking. These pieces work together. If one is weak, the whole flow becomes harder to trust.
Think of it like a small onboarding process. The subscriber enters with a specific expectation. Your automation should meet that expectation, learn enough to personalize the path, and guide the person toward the next useful action.
Audience Data
Audience data is the foundation. Mailchimp stores contact information in audience fields, contact profiles, tags, groups, ecommerce data, and engagement history. Its guide to audience and signup form fields explains how fields store contact information and can be managed through forms or audience settings.
For a new subscriber automation, the most useful data is usually simple. You may need the signup source, first name, interest category, customer status, location, or the specific lead magnet requested. Do not collect data just because you can.
The rule is practical: only ask for information you will actually use. If a field changes the email someone receives, it may be worth collecting. If it only makes the form longer and never affects the experience, cut it.
Tags and Segments
Tags and segments are not the same thing, and confusing them creates messy automations. A tag is a label you apply to a contact, such as “webinar signup,” “ebook download,” “VIP,” or “customer.” A segment is a filtered group of contacts based on conditions, such as people tagged “ebook download” who opened an email in the last 30 days.
Mailchimp’s guide to segmenting options explains that segments can use contact information, audience fields, ecommerce data, integrations, and engagement behavior. That gives you a lot of flexibility, but it also means you should keep the structure clean. Too many random tags can become just as confusing as no tags at all.
For a welcome flow, tags are useful for identifying how someone entered. Segments are useful for deciding who should receive a specific campaign later. Use tags to record meaningful events, then use segments to act on those events.
Timing and Wait Steps
Timing changes how an automation feels. An instant first email is usually best because the subscriber is still paying attention. If they requested a lead magnet, coupon, confirmation, or access link, delaying the first email creates friction.
After the first email, wait steps should feel natural. Sending five emails in one day is usually too much unless the subscriber explicitly signed up for an event that requires urgent reminders. Spacing the next messages over several days gives people time to read, click, and respond without feeling pushed.
Mailchimp automation flows can include wait steps between actions, which makes it easier to pace the experience instead of sending everything at once. The point is not to slow the flow down for no reason. The point is to match the rhythm of the decision the subscriber is making.
The First Email
The first email is the anchor of the entire flow. It should be simple enough to understand in a few seconds and useful enough to justify the open. If you are using Mailchimp to send email to new subscribers, this message is where trust either starts or gets damaged.
A strong first email usually includes a clear subject line, a short welcome, the promised resource or offer, expectations for future emails, and one call to action. The call to action should match the signup intent. For a lead magnet, that may be downloading the resource. For a product discount, that may be shopping the relevant category. For a newsletter, that may be replying with a preference or reading a starter article.
Avoid the common mistake of turning the first email into a brochure. New subscribers do not need everything at once. They need the next best step.
How to Set Up a Mailchimp Automation Flow
Once the structure is clear, the implementation becomes much easier. The goal is not to click around Mailchimp until something works. The goal is to build a clean flow where the trigger, email, timing, and audience rules all support the same subscriber experience.
Mailchimp’s automation flow builder is made for this kind of setup. You can create a flow from scratch or start with a template, then use triggers, rules, and actions to guide contacts through the path. For a new subscriber flow, the simplest version is a signup trigger followed by a send email action, but the professional version usually includes better entry rules, cleaner tagging, and more carefully timing.
Before you start building, write down the exact sentence that defines the flow. For example: “When someone subscribes through the lead magnet form, send the download email immediately, then follow up with helpful context two days later.” That one sentence keeps the automation focused and prevents the flow from turning into a messy chain of unrelated emails.

Step 1: Prepare the Audience
Start inside the audience, not inside the email builder. Confirm that the right audience exists, the signup form is connected, and the fields you need are available. Mailchimp stores contact information in audience fields, and those fields can be managed through its audience and signup form field settings.
Keep the field setup lean. First name, email address, consent, signup source, and interest category are usually enough for a basic welcome flow. If you add more fields, make sure each one has a real use inside the automation or future segmentation.
This is also the time to decide how subscribers will be labeled. If someone joins from a lead magnet, apply a tag that identifies that source. If someone joins from a product waitlist, use a tag that separates them from newsletter-only subscribers.
Step 2: Create the Automation Flow
Go to the automation area and create a marketing automation flow. Mailchimp explains that automation flows can add tags, send targeted emails, and complete other actions for contacts in its guide to creating a marketing automation flow. You can use a prebuilt welcome template if it matches your situation, but starting from scratch is often cleaner when you already know the exact subscriber journey.
Name the flow in a way that will still make sense six months from now. “Welcome Email” is too vague if you eventually have several welcome paths. A better name would be “Lead Magnet Welcome Flow,” “Newsletter New Subscriber Welcome,” or “First Purchase Signup Flow.”
Good naming is not cosmetic. It helps you avoid mistakes later when you are checking reports, updating copy, or troubleshooting why a contact did or did not receive an email. The more automations you build, the more naming discipline matters.
Step 3: Choose the Right Starting Trigger
The trigger decides who enters the flow and when. For the primary keyword here, the most relevant trigger is the one that starts when someone subscribes or meets a signup condition. Mailchimp defines a trigger as the event or action that adds a contact to an automation flow in its documentation on marketing automation flow triggers.
Do not rush this step. If the flow should only apply to people from a specific signup form, lead magnet, or landing page, use the available audience data, tags, or conditions to narrow the entry. If the flow should welcome every new subscriber, keep it broader but still make sure existing contacts are not accidentally pulled in unless that is intentional.
The key question is simple: “Should this person receive this exact first email?” If the answer is not always yes, the trigger needs more filtering. That filter may come from a tag, source field, group, or segment condition.
Step 4: Add the First Send Email Action
After the trigger is set, add the first email action. Mailchimp’s send email action is used when contacts reach a certain point in a flow and should receive a targeted message, and Mailchimp recommends separating emails in a series with time delays to avoid sending too many messages at once in its guide to send email actions. For a new subscriber flow, the first email should usually send immediately unless there is a specific reason to wait.
Give the internal email name a practical label. Use something like “Email 1: Deliver Lead Magnet” or “Email 1: Newsletter Welcome.” This internal name does not need to be clever because it is for you and your team, not the subscriber.
Then write the email around the subscriber’s intent. The subject line should make the email easy to recognize. The body should deliver the promised value quickly. The call to action should ask for one clear next step, not five competing actions.
Step 5: Set the Timing
If the flow has only one email, timing is simple. Send the first message immediately after signup so the subscriber receives what they expected while the moment is still fresh. This is especially important for lead magnets, confirmations, coupons, event access, and any signup where the user expects instant delivery.
If the flow has more than one email, add time delay rules between messages. Mailchimp explains that time delay rules set the pace of a flow by preventing a contact from continuing for a chosen period of time in its guide to time delay rules. This keeps the flow from feeling like a flood.
A practical starting rhythm is immediate delivery, then a follow-up after one or two days, then another message several days later if there is a strong reason for it. The timing should match the decision cycle. A simple newsletter welcome does not need aggressive follow-up, but a product trial or webinar registration may need a tighter sequence.
Step 6: Add Tags or Conditions Where They Help
Tags should make the automation easier to understand, not harder. You can add a tag when someone enters the flow, clicks a key link, downloads a resource, or reaches a meaningful point in the sequence. Mailchimp’s developer guidance explains that tags can support your own targeting strategy inside Mailchimp through its guide to organizing contacts with tags.
Use tags for behavior that matters later. For example, a subscriber who clicks a pricing link may deserve a different follow-up than someone who only downloaded a beginner checklist. A subscriber who joins from a webinar may need event reminders instead of a generic brand welcome.
Do not create a tag for every tiny action. That creates noise. A useful tag should either change the subscriber’s path, improve reporting, or help you send more relevant emails later.
Step 7: Review the Flow Before Turning It On
Before activating the flow, review it from the subscriber’s point of view. Check the trigger, entry conditions, email timing, sender name, subject line, preview text, links, and unsubscribe language. Also confirm that the right audience is selected because sending from the wrong audience is one of those simple mistakes that creates real cleanup work.
Send test emails to yourself and click every important link. Make sure the lead magnet opens, the coupon works, the reply-to address is monitored, and the call to action goes to the correct page. If the signup form promises one thing and the email delivers something else, fix that before the flow goes live.
Finally, activate the automation only after the whole path makes sense. A Mailchimp send email to new subscribers setup is not finished when the email exists. It is finished when the correct person can subscribe, enter the correct flow, receive the correct message, and take the correct next step without confusion.
Statistics and Data
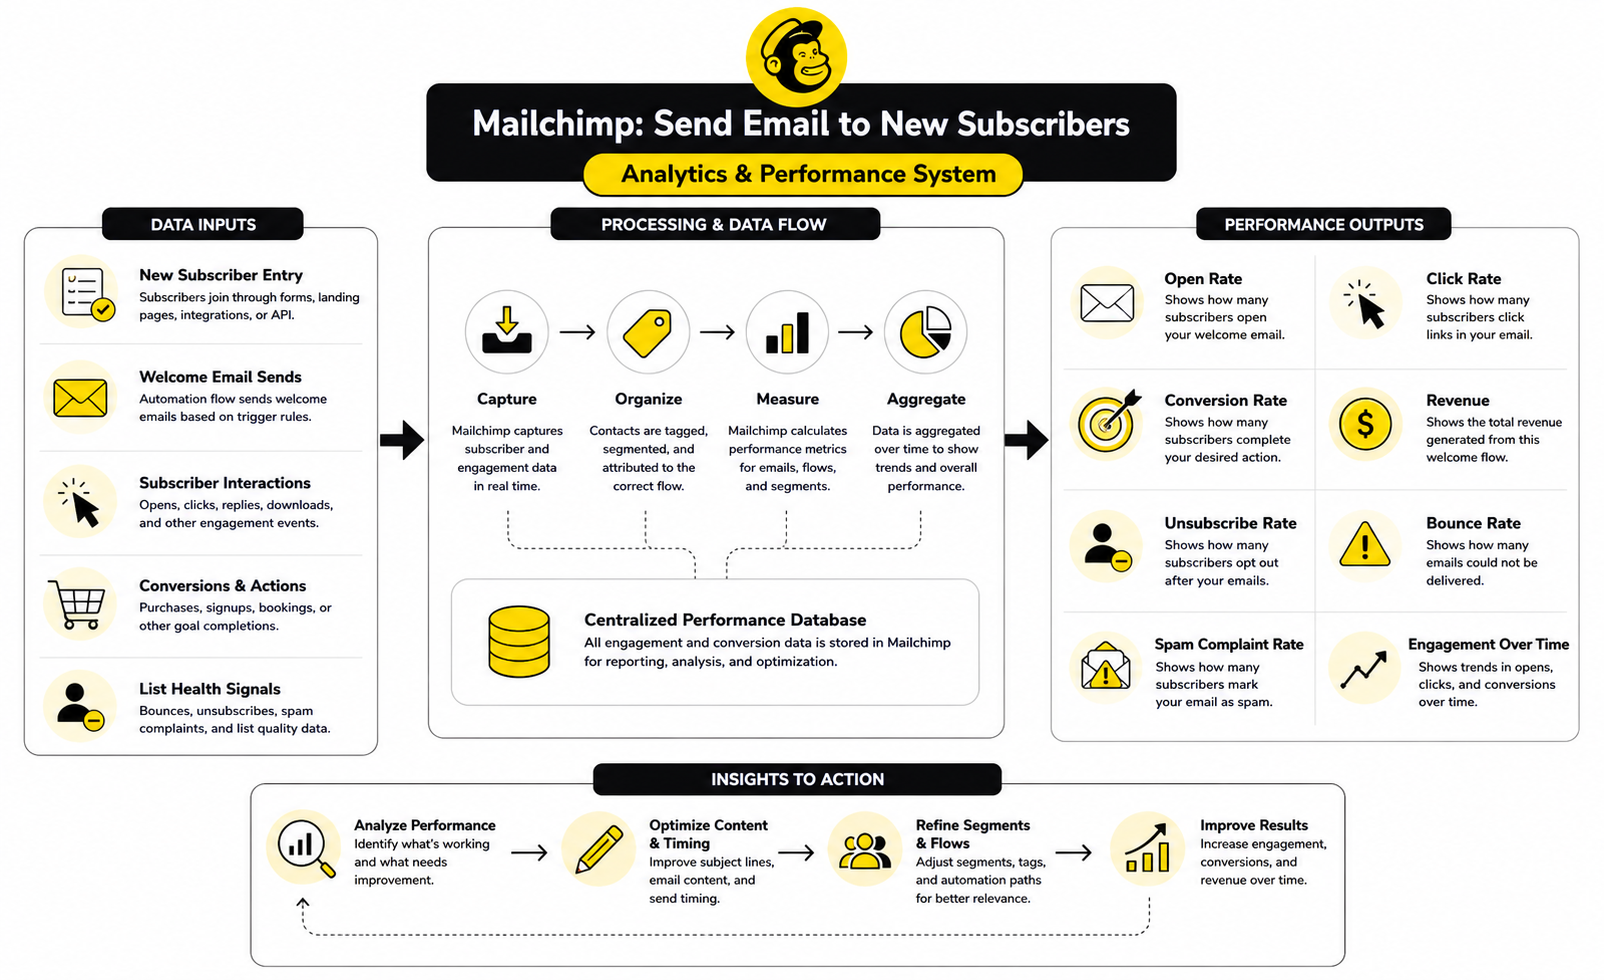
The data inside a Mailchimp send email to new subscribers flow should tell you whether the welcome experience is doing its job. It should not be treated like a scoreboard where a high open rate automatically means success. The real question is whether new subscribers understand the message, click the right next step, stay subscribed, and eventually become more valuable contacts.
Mailchimp’s automation flow reports can track opens, clicks, social activity, purchases, and other activity from the beginning of a flow to the present, which makes them useful for spotting engagement patterns inside a welcome sequence. Mailchimp also explains that these reports can help improve and target future content through its guide to marketing automation flow reports. That matters because the welcome email is not a one-time asset you set and forget; it is a system you improve based on behavior.
Benchmarks can help, but they should stay in their proper place. Mailchimp’s email marketing benchmarks are useful for understanding open rates, click rates, bounce rates, and unsubscribe rates by industry. Still, your own trend line matters more than a broad average because your list source, offer, audience quality, brand trust, and email frequency all affect the numbers.
Open Rate Shows Attention, Not Commitment
Open rate tells you whether the subject line, sender name, timing, and subscriber expectation are strong enough to earn attention. For a welcome email, this number is especially important because the subscriber recently asked to hear from you. If your first email gets weak opens, the problem may be the subject line, the sender name, the delay after signup, or the fact that the subscriber does not recognize why the message arrived.
But open rate has limits. Privacy features and inbox behavior can affect how opens are recorded, so it should not be treated as a perfect measurement of human attention. Use it as a directional signal, not as the final verdict on whether the automation is working.
A practical action from low opens is to tighten the connection between the signup promise and the subject line. If someone requested a checklist, make the subject line clearly about that checklist. If they joined a newsletter, make it obvious that this is the welcome message they expected.
Click Rate Shows Intent
Click rate is usually more meaningful than open rate because it shows that the subscriber did something. They clicked the download link, visited a product page, opened a starter guide, booked a call, or moved toward whatever action the email was designed to drive. This is where the welcome email starts becoming measurable as a business asset.
A low click rate does not always mean the email is bad. Sometimes it means the call to action is unclear, the email has too many links, the offer is not compelling, or the subscriber does not yet have enough context to act. The fix depends on the reason, not on the number alone.
For a first welcome email, one primary click is usually enough. If the message is supposed to deliver a lead magnet, measure that click first. If the message is supposed to move people toward a product or consultation, measure that specific action instead of celebrating random clicks that do not matter.
Bounce Rate Protects Deliverability
Bounce rate tells you whether your emails are reaching valid inboxes. A hard bounce usually means the email address is invalid or cannot receive mail, while softer delivery problems can come from temporary inbox or server issues. Either way, high bounce activity is a warning sign because poor list quality can hurt deliverability over time.
For new subscriber automations, bounce rate often points back to the signup source. If one form, popup, giveaway, or imported list creates more bounces than the rest, the problem may not be Mailchimp. The problem may be low-quality traffic, fake entries, typo-heavy submissions, or contacts added without proper consent.
The action is straightforward: clean the source before blaming the email. Use double opt-in when it makes sense, avoid purchased lists, remove suspicious acquisition methods, and make sure the form clearly explains what people are signing up for. Mailchimp’s compliance guidance also emphasizes permission-based email marketing in its guide to email marketing compliance.
Unsubscribe Rate Measures Expectation Match
Unsubscribes are not always bad. Some people join for a single resource, get what they need, and leave. That is normal, especially when the signup offer attracts people who are only interested in one narrow asset.
The problem is a spike in unsubscribes from the first email or early in the welcome flow. That usually means the subscriber expected one thing and received another. It can also mean the tone is too aggressive, the frequency is too high, or the email feels like a sales pitch before trust has been built.
When unsubscribes rise, do not simply make the email shorter and hope for the best. Compare the form promise, thank-you page, subject line, email content, and call to action. The fastest fix is often better alignment, not softer copy.
Conversion Rate Tells You Whether the Flow Supports the Business
Conversion rate depends on the goal of the flow. For an ecommerce brand, the conversion may be a first purchase. For a consultant, it may be a booked call. For a newsletter, it may be clicking a preference link, replying, or staying engaged through the first few sends.
This is the metric that keeps the whole system honest. A welcome email can have strong opens and decent clicks while still failing to move subscribers toward a meaningful next step. That usually happens when the email is interesting but disconnected from the business model.
Define the conversion before you judge performance. If the goal is to deliver a resource, track downloads. If the goal is a purchase, track revenue or product page behavior where possible. If the goal is sales conversations, track replies, booked calls, or qualified form submissions.
Revenue Per Subscriber Gives the Cleanest Long-Term View
Revenue per subscriber is not always available immediately, but it is one of the cleanest ways to judge a welcome system over time. It helps answer a better question than “Did the email perform?” The better question is, “Are new subscribers becoming more valuable after they enter this flow?”
This matters when comparing signup sources. A giveaway may produce lots of subscribers with weak purchase behavior, while a smaller product guide may produce fewer subscribers who buy more often. Without revenue or downstream value tracking, the larger list can look better even when it is not.
Mailchimp can connect automation activity with ecommerce data when the store integration supports it, which helps connect welcome emails to purchases and customer value. If your setup does not track revenue directly, use the closest meaningful proxy, such as booked calls, trial starts, demo requests, coupon redemptions, or repeat engagement.
Benchmarks Are Starting Points, Not Targets
Benchmarks are useful because they stop you from judging performance in isolation. Mailchimp’s benchmark data helps compare open, click, bounce, and unsubscribe patterns across industries, while the DMA’s Email Benchmarking Report 2025 is positioned around more carefully benchmarking and performance improvement. These sources can help you understand whether your numbers look unusually weak, average, or strong.
But benchmarks can become a trap. A welcome email for a niche B2B service, a local ecommerce store, and a creator newsletter should not be judged with the exact same expectations. List source, offer type, relationship strength, purchase cycle, and deliverability all change the baseline.
Use benchmarks to diagnose, not to brag. If your click rate is low compared with your category, review the offer and call to action. If your unsubscribe rate is high, review expectation mismatch. If your bounce rate is high, review acquisition quality before touching the copy.
Build a Simple Measurement Dashboard
You do not need a complex dashboard to improve a new subscriber automation. You need a clean view of the few numbers that explain the subscriber journey. For most businesses, that means tracking entry volume, open rate, click rate, bounce rate, unsubscribe rate, conversion rate, and revenue or qualified action value.
The dashboard should separate the first email from the rest of the flow. Email one is responsible for recognition, delivery, and the first action. Later emails are responsible for education, trust, and deeper movement.
Review the dashboard on a regular schedule, not every five minutes. Weekly or biweekly is enough for many smaller lists, while high-volume lists can move faster. The point is to make decisions from patterns, not from one strange day of data.
What the Data Should Make You Change
Good analytics should create decisions. If opens are weak, test sender name, subject line, timing, and signup confirmation language. If clicks are weak, simplify the call to action and make the promised value more obvious.
If unsubscribes are high, reduce expectation mismatch and check whether the email is too sales-heavy too soon. If conversions are weak despite strong clicks, the problem may be the landing page, offer, pricing, trust, or next-step friction rather than the Mailchimp email itself. This is where you need to look beyond the email report and inspect the full path after the click.
The best operators do not change everything at once. They isolate one likely problem, make one meaningful improvement, and watch what happens. That is how a Mailchimp send email to new subscribers automation turns from a basic autoresponder into a measurable growth asset.
Professional Implementation Tips for Better Results
Once the basic flow works, the real work is making it resilient. A Mailchimp send email to new subscribers setup should not break when traffic increases, when the list gets segmented, or when the business adds new offers. The best version is simple for the subscriber and structured behind the scenes.
This is where many brands make the wrong tradeoff. They either keep everything too basic and miss easy personalization, or they overbuild a complicated automation that nobody wants to maintain. The professional approach sits in the middle: clear entry rules, clean data, useful branches, and enough reporting to make smart decisions.
The goal is not to impress yourself with a giant flow map. The goal is to send the right first message, protect deliverability, and move subscribers toward a meaningful next step without creating operational chaos.
Keep the First Flow Narrow
A welcome automation should have a clear job. If it welcomes newsletter subscribers, keep it focused on newsletter expectations. If it delivers a lead magnet, keep it focused on the resource and the next logical step after that resource.
Problems start when one flow tries to do too much. A single automation that welcomes everyone, sells three offers, promotes a webinar, handles abandoned carts, and reactivates cold contacts becomes hard to understand and even harder to improve. When performance drops, you will not know which part of the machine caused the issue.
A better approach is to build separate flows for separate intents. Use one flow for general newsletter subscribers, another for lead magnet delivery, another for ecommerce discount signups, and another for sales-qualified leads. That structure keeps each automation easier to test, explain, and optimize.
Use Branching Only When It Changes the Message
Branching can make a welcome flow much more carefully, but it should never be added just because the tool allows it. A branch is useful when two groups of subscribers need different timing, different content, or different calls to action. If both paths would receive almost the same email, the branch is probably unnecessary.
The best branching logic is based on meaningful context. That might include signup source, interest category, customer status, location, previous purchase behavior, or whether the subscriber clicked a key link. These details can help the automation feel more relevant without making the system feel over-personalized or creepy.
Keep branches readable. If you need a diagram just to understand why someone received email three, the setup is probably too complex. Simple branches with clear labels usually outperform clever systems that only the original builder understands.
Do Not Personalize With Weak Data
Personalization is powerful when the data is accurate. It is embarrassing when the data is missing, outdated, or used in a way that feels forced. A welcome email that says “Hi FNAME” or references the wrong interest category immediately damages trust.
Use personalization only where it improves clarity. A first name can work if your data is clean. A source-based message can work if the signup source is captured reliably. A product-specific follow-up can work if purchase or browsing data is accurate enough to trust.
Do not confuse personalization with relevance. Relevance can be as simple as sending a different welcome email to someone who joined from a beginner guide versus someone who joined from a pricing page. That kind of practical personalization usually matters more than stuffing merge tags into every paragraph.
Protect Deliverability Before Scaling
Deliverability is not something you fix after the list gets big. It should be built into the system from the start. If your welcome emails land in spam, the automation can look perfect on paper and still fail in practice.
Use a real sending domain, authenticate it properly, avoid purchased lists, and make sure subscribers clearly opted in. Keep your signup forms honest so people understand what they will receive. If you are collecting emails through giveaways, partner promotions, or aggressive popups, watch bounce rates and unsubscribe rates carefully because those sources can produce lower-quality subscribers.
Also pay attention to your first few sends. A welcome email that gets ignored, deleted, or marked as spam sends the wrong signal early. A useful first email with a recognizable sender name and a clear reason for arriving gives the relationship a much better start.
Know When Mailchimp Is Enough
Mailchimp is a strong fit when you need clean email automation, audience management, forms, basic segmentation, ecommerce integrations, and reports inside one familiar platform. For many creators, small businesses, ecommerce stores, and service providers, that is more than enough. The danger is not using Mailchimp; the danger is using it without a clear subscriber journey.
You do not need a heavier platform just because your welcome sequence has a few emails. If your main goal is to send a welcome email, deliver a lead magnet, tag subscribers, and follow up with simple education, Mailchimp can handle that cleanly. In that case, the biggest gains usually come from better copy, better segmentation, and better signup intent.
But if your business needs deeper sales pipeline automation, multi-channel follow-up, appointment workflows, SMS, call tracking, or agency-style client management, you may eventually outgrow a pure email setup. That does not make Mailchimp bad. It simply means the automation needs have moved beyond the first subscriber email.
Know When to Add Another Tool
Some businesses need more than email after someone subscribes. A lead may need to book a call, receive SMS reminders, enter a CRM pipeline, trigger a sales task, or move through a funnel with multiple pages. In those cases, the welcome email is only one step in a larger conversion system.
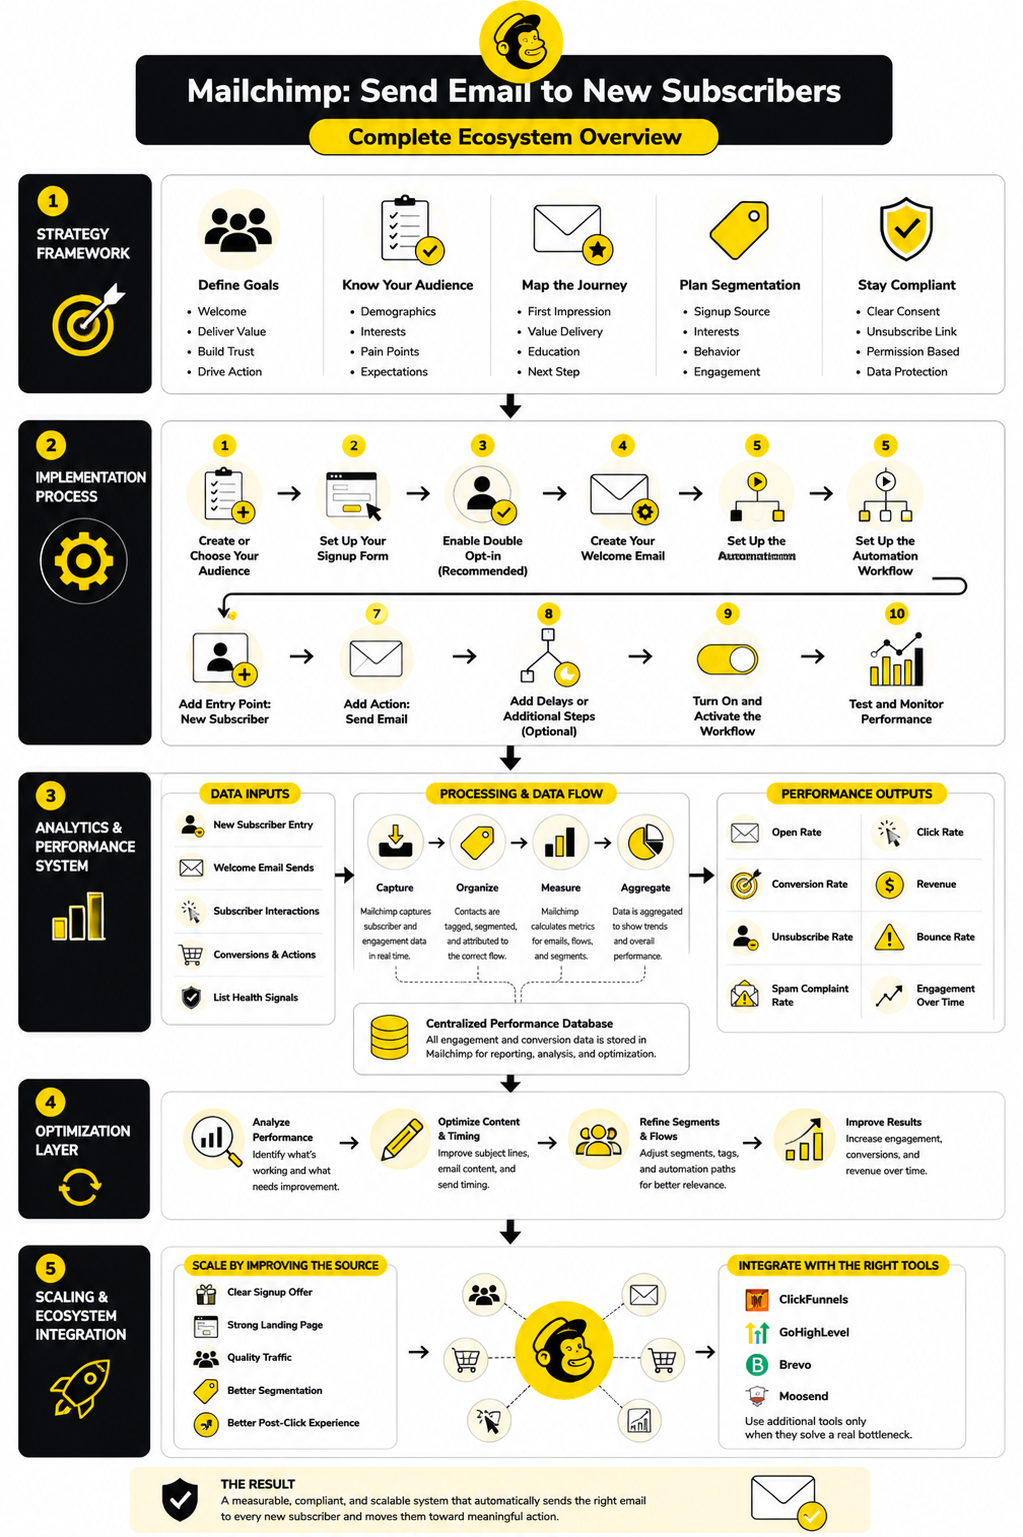
For funnel-heavy businesses, ClickFunnels can make sense when the signup experience, offer page, and sales path need to be built around conversion pages rather than a simple embedded form. For agencies and service businesses that need CRM, pipelines, follow-up, and client communication in one place, GoHighLevel is often a better fit than trying to force every operational task into an email platform. For businesses comparing email-focused alternatives, Brevo and Moosend may be worth reviewing if pricing, automation style, or list management needs change.
The key is not to stack tools too early. Add another tool only when it solves a real bottleneck. If the current problem is weak welcome copy, poor list quality, or unclear offers, switching platforms will not magically fix it.
Avoid Automation Conflicts
As your email system grows, one subscriber can qualify for multiple automations at once. They might join a lead magnet flow, trigger a newsletter welcome, receive a product education sequence, and enter a sales follow-up path within the same week. That creates a bad experience fast.
Build rules that prevent overload. Use tags, suppression segments, and timing logic to decide which automation has priority. A new customer should not receive a beginner sales nurture email that ignores the purchase they just made.
Create a simple hierarchy. Transactional or promised delivery emails come first. Purchase-related onboarding comes next. General newsletters and promotional sequences should respect what the subscriber is already receiving. This keeps the inbox experience calm and intentional.
Plan for Handoffs Between Automations
A welcome flow should not end in a dead stop unless that is intentional. Once the final welcome email is sent, the subscriber should move naturally into the next relevant relationship stage. That might be the regular newsletter, a product education sequence, a sales nurture path, or a re-engagement segment later.
The handoff should be planned before the flow is launched. Decide what tag gets applied when someone completes the welcome sequence. Decide whether they should be added to a segment for future campaigns. Decide whether clicks or non-clicks should change the next path.
This is where automation becomes strategic. You are not just sending a welcome email. You are designing what happens after the first moment of attention so the subscriber does not disappear into a messy list with no clear next step.
Keep Compliance Boring and Strong
Compliance should be boring. That is a good thing. The subscriber should know why they are on the list, what they will receive, who is sending the email, and how to unsubscribe.
Do not hide the unsubscribe link, use confusing sender names, or add people to marketing emails without consent. Do not use a lead magnet signup as permission to send unrelated promotions forever unless the form clearly sets that expectation. This is not just about legal risk; it is about trust and inbox reputation.
A clean welcome email reinforces permission. It reminds people what they signed up for, gives them the value they expected, and makes the next step clear. That simple clarity protects both the subscriber relationship and the long-term health of the list.
Document the Flow Like Someone Else Will Maintain It
Most automation systems become messy because nobody documents the logic. The original builder understands why the tags exist, why the delay is three days, and why one branch excludes a certain segment. Six months later, nobody remembers.
Create a short internal note for each flow. Include the purpose, entry trigger, target audience, key tags, email count, main call to action, and success metric. This does not need to be a huge strategy document. It just needs to make the automation understandable to a future version of you or someone else on the team.
This habit becomes more valuable as the business scales. When you have five flows, documentation feels optional. When you have twenty, it becomes the difference between a manageable system and a fragile mess.
Scale by Improving the Source, Not Just the Sequence
When a welcome automation underperforms, it is tempting to rewrite every email. Sometimes that helps. But often the bigger issue is the quality and intent of the subscribers entering the flow.
A clear signup offer attracts better subscribers than a vague “join our list” box. A useful landing page sets stronger expectations than a generic popup. A form that captures one meaningful preference can create better follow-up than a form that collects only an email address.
Scaling the automation means improving the top of the system, not just the emails inside it. Better traffic, better signup promises, better segmentation, and better post-click experiences will usually do more than endlessly polishing a subject line. The email matters, but the subscriber’s intent before the email matters too.
Make the First Email Easy to Reply To
One underrated improvement is making the first email feel reply-worthy. A welcome email does not always need to push people to a sales page. Sometimes the most valuable action is a reply that reveals what the subscriber wants, what they are struggling with, or why they joined.
This works especially well for service providers, consultants, creators, coaches, and B2B businesses. A simple question near the end of the first email can create real conversations. It can also give you language for future content, offers, and segmentation.
Make sure replies go somewhere useful. If the reply-to address is ignored, do not ask people to respond. If you invite conversation, treat that inbox like part of the customer experience.
Testing, Optimization, Troubleshooting, and FAQ
Before the full system is finished, test it like a subscriber would experience it. Submit the form, confirm the contact appears in the correct audience, check whether the right tag is applied, and verify that the automation starts from the correct trigger. Then open the email, click the links, reply to the message, and follow the post-click path all the way through.
This final testing layer is where hidden problems show up. A broken download link, a wrong sender name, a missing tag, or a confusing thank-you page can make a technically correct automation feel sloppy to the subscriber. Mailchimp’s automation flows rely on triggers, rules, and actions working together on a flow map, so the safest approach is to test the full journey instead of checking each piece in isolation through the automation flow builder.
Optimization should also stay practical. Do not change the subject line, email copy, signup form, call to action, and landing page all at once. Change one meaningful thing, watch the result, then decide what to improve next.
Troubleshooting Common Problems
If the welcome email is not sending, start with the trigger. Confirm that the subscriber actually meets the trigger condition and that the automation is active, not paused or still in draft. Mailchimp’s guide to automation flow triggers explains that contacts enter a flow based on conditions you set, so a small mismatch in the entry rule can stop the whole process.
If the wrong people are entering the flow, review your audience rules, tags, and signup source logic. This often happens when the trigger is too broad or when old contacts are allowed to enter a flow that was meant only for fresh subscribers. Tighten the entry condition before rewriting the email.
If subscribers receive too many emails too quickly, look at your delay rules and overlapping automations. Mailchimp’s time delay rules are designed to pace contacts through a flow, so use them intentionally. A good welcome system should feel responsive, not overwhelming.
Final Pre-Launch Checklist
A launch checklist keeps small mistakes from becoming public mistakes. It also gives you a repeatable process for future welcome flows. Use it before activating a new subscriber automation and again whenever you make major edits.
This checklist is not exciting, but it is useful. Most automation failures are not caused by sophisticated strategy errors. They are caused by simple setup gaps that nobody caught before launch.
How do I make Mailchimp send email to new subscribers automatically?
Create a marketing automation flow and use a signup-related trigger that adds new contacts to the flow when they subscribe or meet the entry condition. Then add a send email action, write the welcome message, set the timing, test the path, and activate the flow. Mailchimp’s guide to creating a marketing automation flow explains that flows can send targeted emails, add tags, and complete other automated tasks.
Can Mailchimp send a welcome email immediately after someone subscribes?
Yes, Mailchimp can send a welcome email immediately if the automation trigger and first send email action are set up without a delay. This is usually the right choice when the subscriber expects a lead magnet, coupon, confirmation, or access link. If you add a time delay before the first email, make sure there is a strategic reason for it.
Should I use Mailchimp’s final welcome email or an automation flow?
Use an automation flow if you want more control over timing, tagging, segmentation, follow-up emails, or conditional paths. A basic final welcome email can work for a simple confirmation, but it is limited compared with a proper automation flow. If the welcome email is part of a larger subscriber journey, build it as a flow.
Why is my Mailchimp welcome email not sending?
The most common causes are an inactive automation, the wrong audience, a trigger condition the subscriber does not meet, a missing tag, or a test contact that was already in the audience before the flow was activated. Check the entry trigger first because the flow cannot send anything if the contact never enters it. Then test with a fresh email address so you can see the automation from a true new subscriber’s point of view.
Can I send different welcome emails to different types of subscribers?
Yes, and this is often a better setup than sending one generic message to everyone. You can use signup source, tags, groups, fields, segments, or conditional logic to route subscribers into different paths. The key is to branch only when the message genuinely needs to change.
How many emails should a new subscriber sequence include?
A simple welcome flow may need only one email, especially when the goal is confirmation or delivery. A more strategic welcome sequence often includes three to five emails if the subscriber needs education, trust-building, or guidance before taking action. Do not add more emails just to make the sequence look advanced.
What should the first Mailchimp welcome email say?
The first email should confirm the subscription, deliver the promised value, set expectations, and give one clear next step. Keep the message focused on why the person subscribed. Avoid turning the first email into a long brand brochure.
Should I use double opt-in for new subscribers?
Double opt-in can improve list quality because subscribers must confirm their email address before joining the list. It can also reduce fake addresses, typo submissions, and low-intent signups. The tradeoff is that some people will not complete the confirmation step, so use it when list quality and consent clarity matter more than maximizing raw signup volume.
What metrics should I track for a Mailchimp new subscriber automation?
Track entry volume, open rate, click rate, bounce rate, unsubscribe rate, conversion rate, and revenue or qualified action value where possible. Open rate helps you understand attention, click rate shows intent, and conversion rate tells you whether the automation supports the business. Mailchimp’s automation flow reports can show flow-level performance from the beginning of the automation to the present.
What is a good open rate for a welcome email?
There is no universal number because industry, list source, sender reputation, offer type, and audience intent all change the baseline. Mailchimp’s email marketing benchmarks can help you compare broad industry averages, but your own trend line is more important. If your welcome email open rate drops over time, review the sender name, subject line, signup promise, and delivery timing.
Why are people unsubscribing after the first email?
Early unsubscribes usually mean the email did not match the subscriber’s expectation. The form may have promised one thing while the email delivered another, or the first message may have felt too sales-heavy too soon. Compare the signup form, thank-you page, subject line, and email body before assuming the audience is the problem.
Can I add subscribers from a form built outside Mailchimp?
Yes, but the form or integration must pass the right data into Mailchimp. That usually means sending the email address, consent status, tags, fields, or source information into the correct audience. Test the integration carefully because a third-party form that fails to apply the right tag can stop the automation from starting or route subscribers into the wrong flow.
Can Mailchimp send a lead magnet to new subscribers?
Yes, and this is one of the most common reasons to create a welcome automation. The first email can include the download link, access instructions, or next step connected to the lead magnet. Just make sure the subject line clearly matches the resource the subscriber requested.
How do I stop existing contacts from getting the new subscriber email?
Use entry rules that only allow the right contacts to enter the flow. This may involve using a fresh signup trigger, excluding existing contacts, or filtering by a tag that is applied only through the current signup source. Always test with a new contact and review the flow settings before turning it on.
Can I use Mailchimp with a funnel or CRM tool?
Yes, but the integration should have a clear purpose. A funnel tool can handle the signup page and offer path, while Mailchimp can handle email delivery and subscriber follow-up. If the business also needs pipelines, sales tasks, appointment workflows, or multi-channel communication, a broader CRM setup such as GoHighLevel may make more sense.
Build a stronger local presence with BAAM AI
Turn your website, Google profile, social channels, and AI visibility into one growth engine
Most businesses do not need more random marketing activity. They need a consistent presence system that helps the right people find them, trust them, and take action. BAAM AI brings strategy, local SEO, website updates, Google Maps visibility, social content, AI-search readiness, media production, and reporting into one practical monthly engine.
If you want your marketing to keep working after the campaign ends, start with a free BAAM AI presence audit. See how your business shows up today and where the fastest visibility wins are at BAAM AI.